Php парсинг html, с помощью simple html dom
Содержание:
- Проблемы совместимости карты памяти и читающего устройства
- API Reference
- Шаг 2 – Основы HTML парсинга
- Парсеры сайтов по способу доступа к интерфейсу
- Скрипт Human Emulator парсинга HTML-страницы с использованием XPath
- Enable result caching
- Генри Форд — Моя жизнь, мои достижения
- Learning more
- Upgrading to 3.0.0
- Want to ride the bleeding edge?
- Purpose
- Loading Files
- Неправильная кодировка при использовании cURL
- Custom Parsers/Formatters
- Version 4.4.0 (2020-04-10)
- Написание класса парсера
- Usage
- Private Tunnel
- Tips
- Режим навигации
- 10. Мэрилин Монро
- Camel naming convertions
- Разбор файла в PHP — выводы
Проблемы совместимости карты памяти и читающего устройства
API Reference
Helper functions
| Name | Description |
|---|---|
| object str_get_html ( string $content ) | Creates a DOM object from a string. |
| object file_get_html ( string $filename ) | Creates a DOM object from a file or a URL. |
DOM methods & properties
| Name | Description |
|---|---|
|
void __construct ( ) |
Constructor, set the filename parameter will automatically load the contents, either text or file/url. |
|
string plaintext |
Returns the contents extracted from HTML. |
|
void clear () |
Clean up memory. |
|
void load ( string $content ) |
Load contents from a string. |
|
string save ( ) |
Dumps the internal DOM tree back into a string. If the $filename is set, result string will save to file. |
|
void load_file ( string $filename ) |
Load contents from a from a file or a URL. |
|
void set_callback ( string $function_name ) |
Set a callback function. |
|
mixed find ( string $selector ) |
Find elements by the CSS selector. Returns the Nth element object if index is set, otherwise return an array of object. |
Element methods & properties
| Name | Description |
|---|---|
| string | Read or write element’s attribure value. |
|
string tag |
Read or write the tag name of element. |
|
string outertext |
Read or write the outer HTML text of element. |
|
string innertext |
Read or write the inner HTML text of element. |
|
string plaintext |
Read or write the plain text of element. |
|
mixed find ( string $selector ) |
Find children by the CSS selector. Returns the Nth element object if index is set, otherwise, return an array of object. |
DOM traversing
| Name | Description |
|---|---|
|
mixed $e->children ( ) |
Returns the Nth child object if index is set, otherwise return an array of children. |
|
element $e->parent () |
Returns the parent of element. |
|
element $e->first_child () |
Returns the first child of element, or null if not found. |
|
element $e->last_child () |
Returns the last child of element, or null if not found. |
|
element $e->next_sibling () |
Returns the next sibling of element, or null if not found. |
|
element $e->prev_sibling () |
Returns the previous sibling of element, or null if not found. |
Шаг 2 – Основы HTML парсинга
Эта библиотека, очень проста в использовании, но все же,
необходимо разобрать некоторые основы, перед тем как ее использовать.
Загрузка HTML
$html = new simple_html_dom();

// Load from a string

$html->load('<html><body><p>Hello World!</p><p>We're here</p></body></html>');

// Load a file

$html->load_file('http://sitear.ru/');
Все просто, вы можете создать объект, загружая HTML из
строки. Или, загрузить HTML код из файла. Загрузить файл вы можете по URL адресу, или
с вашей локальной файловой системы (сервера).
Важно помнить: Метод
load_file(), работает на использовании PHP функции file_get_contents. Если в
вашем файле php.ini, параметр allow_url_fopen
не установлен как true,
вы не сможете получать HTML файлы по удаленному адресу
Но, вы сможете загрузить эти
файлы, используя библиотеку CURL. Далее, прочитать содержимое, используя метод load().
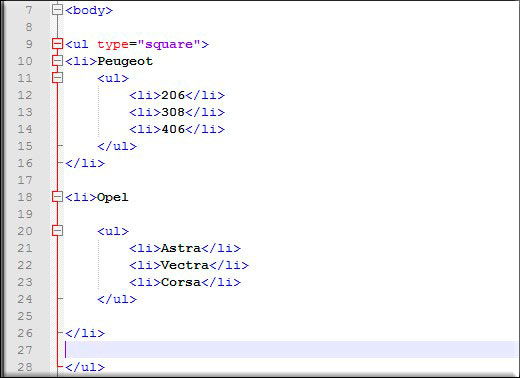
Получение доступа к HTML DOM объектам
Предположим у нас уже есть DOM объект,
структурой, как на картинке выше. Вы можете начать работать с ним, используя
метод find(), и создавая коллекции. Коллекции – это группы объектов, найденные
с помощью селекторов – синтаксис в чем-то схож с jQuery.
<html>

<body>

    <p>Hello World!</p>

    <p>We're Here.</p>

</body>

</html>
Используя этот пример HTML кода, мы узнаем, как получить доступ
к информации заключенной во втором параграфе (p). Также, мы изменим полученную
информацию и выведем результат на дисплей.
// создание объекта парсера и получение HTML

include('simple_html_dom.php');

$html = new simple_html_dom();

$html->load("<html><body><p>Hello World!</p><p>We're here</p></body></html>");

// получение массивов параграфов

$element = $html->find("p");

// изменение информации внутри параграфа

$element->innertext .= " and we're here to stay.";

// вывод

echo $html->save();
Как видите реализовать PHP парсинг документа HTML, очень даже просто, используя simple HTML DOM библиотеку.
В принципе, в этом куске PHP кода, все можно понять интуитивно, но если вы в чем-то
сомневаетесь, мы рассмотрим код.
Линия 2-4:
подключаем библиотеку, создаем объект класса и загружаем HTML код из
строки.
Линия 7: С
помощью данной строки, находим все <p> теги в HTML коде,
и сохраняем в переменной в виде массива. Первый параграф будет иметь индекс 0,
остальные параграфы будут индексированы соответственно 1,2,3…
Линия 10:
Получаем содержимое второго параграфа в нашей коллекции. Его индекс будет 1.
Также мы вносим изменения в текст с помощью атрибута innertext. Атрибут innertext, меняет все содержимое внутри
указанного тега. Также мы сможем
изменить сам тег с помощью атрибута outertext.
Давайте добавим еще одну строку PHP кода, с помощью которой мы назначим
класс стиля нашему параграфу.
$element->class = "class_name";

echo $html->save();
Результатом выполнения нашего кода будет следующий HTML документ:
<html>

<body>

    <p>Hello World!</p>

    <p class="class_name">We're here and we're here to stay.</p>

</body>

</html>
Другие селекторы
Ниже приведены другие примеры селекторов. Если вы
использовали jQuery, то
в библиотеке simple html dom синтаксис немножко схожий.
// получить первый элемент с id="foo"

$single = $html->find('#foo', 0);

// получает при парсинге все элементы с классом class="foo"

$collection = $html->find('.foo');

// получает все теги <a> при парсинге htmlдокумента

$collection = $html->find('a');

// получает все теги <a>, которые помещены в тег <h1>

$collection = $html->find('h1 a');

// получает все изображения с title='himom'

$collection = $html->find('img');
Использование первого селектора при php парсинге html документа,
очень простое и понятное. Его уникальность в том что он возвращает только один html элемент,
в отличии от других, которые возвращают массив (коллекцию). Вторым параметром (0),
мы указываем, что нам необходим только первый элемент нашей коллекции. Надеюсь,
вам понятны все варианты селекторов библиотеки simple HTML DOM, если вы чего-то не
поняли, попробуйте метод научного эксперимента. Если даже он не помог,
обратитесь в комментарии к статье.
Документация библиотеки
simple HTML DOM
Полнейшую документацию по использованию библиотеки simple HTML DOM вы
сможете найти по этому адресу:
http://simplehtmldom.sourceforge.net/manual.htm
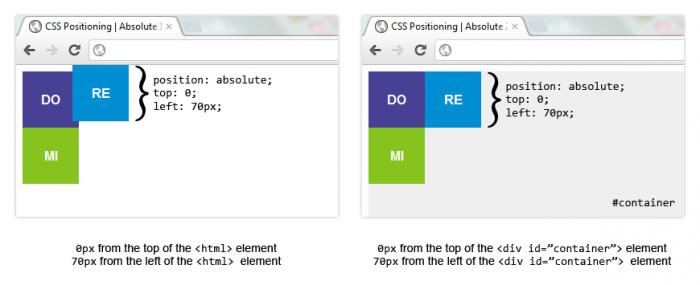
Просто предоставлю вам иллюстрацию, которая показывает
возможные свойства выбранного HTML DOM элемента.
Парсеры сайтов по способу доступа к интерфейсу
Облачные парсеры
Облачные сервисы не требуют установки на ПК. Все данные хранятся на серверах разработчиков, вы скачиваете только результат парсинга. Доступ к программному обеспечению осуществляется через веб-интерфейс или по API.
Примеры облачных парсеров с англоязычным интерфейсом:
- http://import.io/,
- Mozenda (есть также ПО для установки на компьютер),
- Octoparce,
- ParseHub.
Примеры облачных парсеров с русскоязычным интерфейсом:
- Xmldatafeed,
- Диггернаут,
- Catalogloader.
У всех сервисов есть бесплатная версия, которая ограничена или периодом использования, или количеством страниц для сканирования.
Программы-парсеры
ПO для парсинга устанавливается на компьютер. В подавляющем большинстве случаев такие парсеры совместимы с ОС Windows. Обладателям mac OS можно запускать их с виртуальных машин. Некоторые программы могут работать со съемных носителей.
Примеры парсеров-программ:
- ParserOK,
- Datacol,
- SEO-парсеры — Screaming Frog, ComparseR, Netpeak Spider и другие.
Скрипт Human Emulator парсинга HTML-страницы с использованием XPath
В этой статье мы рассмотрим один из примеров написания скрипта для парсингаHTML-страниц с использованием XPath на примере сайта bing.com.
Сперва определимся с тем, что такое XPath и зачем оно нужно, если есть регулярные выражения?
XPath (XML Path Language) — это язык запросов к элементам XML-подобного документа (далее для краткости просто XML). XPath призван реализовать навигацию по DOM в XML.
Regexp — формальный язык поиска и осуществления манипуляций с подстроками в тексте, основанный на использовании метасимволов. По сути это строка-образец (шаблон), состоящая из символов и метасимволов и задающая правило поиска.
Итак, главная разница в том, что XPath специализируется на XML, а Regexp — на любом виде текста.
В: Зачем использовать XPath, если есть regexp, в котором можно сделать тоже самое?О: Простота поддержки.
Синтаксис у regexp такой, что уже через неделю может быть проще всё переписать, чем вносить изменения, а с XPath можно спокойно работать. И синтаксис у xpath довольно компактный,xml’ё-фобы могут быть спокойны.
Простой пример для вдохновления — получим значение аттрибута «href» у, например, тега «a».
Yohoho! Regexp:
Быстро (несколько небольших страниц) пробежаться по основам XPath можно в туториале от .
Как использовать XPath в PHP можно почитать в документации на . И в небольшом тутораильчике от .
Теперь определимся с необходимым функционалом скрипта:
* Возможность указывать произвольный поисковый запрос
* Парсим только первую страницу поисковой выдачи
* Из поисковой выдачи нам нужно:
* заголовок
* ссылка
* номер в выдаче
Исходя из нашего ТЗ составляем примерный алгоритм работы скрипта:
1) Заходим на bing.com
2) Вводим поисковую фразу
3) Получаем со страницы необходимый результат
Приступим к написанию парсера поисковой выдачи http://bing.com. Для начала, создадим базовый каркас скрипта.
// coding: windows-1251 // Настройка HumanEmulator // ———————————————— // Где запущен XHE $xhe_host = «127.0.0.1:7010»; // HumanEmulator lib require «../../Templates/xweb_human_emulator.php»; // Our tools require «tools/functions.php»; // Настройки скрипта // ———————————————— // Скрипт // ———————————————— // Quit $app->quit();
В настройки добавим переменную для хранения поискового запроса.
// Поисковый запрос $text = «ХуманЭмулятор»;
Заходим на сайт.
// Базовый URL $base_url = «https://www.bing.com/?setlang=en»; $browser->navigate($base_url);
Вводим поисковую фразу.
$input->set_value_by_attribute(«name», «q», true, $text); sleep(1); $element->click_by_attribute(«type», «submit»); sleep(5);
Сохраним в переменную содержимое страницы.
// Получаем содержимое страницы $content = $webpage->get_body();
Настроим xpath-объект:
$dom = new DOMDocument; @$dom->loadHTML($content); $xpath = new DOMXpath($dom);
Теперь у объекта $xpath есть метод «query» в который мы будемпередавать наше xpath-выражение. Давайте начнём создавать xpath-выражение.Открыв исходный код страницы с результатами поисковой выдачи увидим, что сами результаты находятся внутри тега «li».
Т.о. наше xpath-выражение выберет со страницы все поисковые результаты.
$results = $xpath->query(«//li»);
На одной странице у нас должно быть 1 или больше результатов, проверим себя:
if($results === false) { echo «С нашим xpath-выражением что-то не так.» . PHP_EOL; $app->quit(); } elseif($results->length === 0) { echo «Поисковый запрос ‘{$text}’ не принёс результатов.» . PHP_EOL: $app->quit(); } echo «Нашли {$results->length} совпадений.» . PHP_EOL;
Здесь стоит обратить внимание на ветку if, где мы сравниваем кол-во результатов xpath-поиска с нулём. Если наше xpath-выражение ничего не нашло, то это может означать две вещи:* Bing действительно ничего не нашёл
* Bing что-то нашёл, но поменял вёрстку на странице, и наше xpath-выражение необходимо исправлять.
2-й пункт достаточно коварный, в таких случаях, когда xpath-выражение ничего не находит необходимо дополнительно сверятся, чтобы удостоверится, что xpath-выражение не устарело (хотя и это не даст 100% гарантий). В нашем случае будем сверяться с тем, что Bing пишет кол-во найденных результатов.
14 results
А если результатов по поисковому запросу нет, то:
Enable result caching
WhichBrowser supports PSR-6 compatible cache adapters for caching results between requests. Using a cache is especially useful if you use WhichBrowser on every page of your website and a user visits multiple pages. During the first visit the headers will be parsed and the result will be cached. Upon further visits, the cached results will be used, which is much faster than having to parse the headers again and again.
For example, if you want to enable a memcached based cache you need to install an extra composer package:
And change the call to WhichBrowser/Parser as follows:
$client = new \Memcached();
$client->addServer('localhost', 11211);

$pool = new \Cache\Adapter\Memcached\MemcachedCachePool($client);

$result = new WhichBrowser\Parser(getallheaders(), );
or
$client = new \Memcached();
$client->addServer('localhost', 11211);

$pool = new \Cache\Adapter\Memcached\MemcachedCachePool($client);

$result = new WhichBrowser\Parser();
$result->setCache($pool);
$result->analyse(getallheaders());
You can also specify after how many seconds a cached result should be discarded. The default value is 900 seconds or 15 minutes. If you think WhichBrowser uses too much memory for caching, you should lower this value. You can do this by setting the option or passing it as a second parameter to the function.
Генри Форд — Моя жизнь, мои достижения
Автобиография великого изобретателя и создателя известнейшей компании в мире. В ней он поделится своим мнением о бизнесе и принципами, которыми он руководствовался при его создании.
Он расскажет о своей непростой жизни, взлетах и падениях, судебных разбирательствах, в которых ему приходилось участвовать, о полном разорении и получении огромного состояния. В книге приведены примеры многих сложных производственных процессов, которые разработал и запустил в собственный бизнес сам автор.
Генри Форд был не только гениальным изобретателем, но и талантливым менеджером. Его секреты управления используются во многих компаниях и по сей день. Эта книга послужит настоящим учебником для начинающих бизнесменов.
Купить электронную книгу в ЛитРес
Купить аудиокнигу в ЛитРес
Купить бумажную книгу в Лабиринте
Learning more
You also have a very powerful tool inside your GraphQL Playground. Please look at the right side of your GraphQL Playground. You will see the and menus. They are automatically generated by analyzing your application schema. Please refer to them and learn more about everything that you can do with your Parse GraphQL API.
Upgrading to 3.0.0
Starting 3.0.0, parse-server uses the JS SDK version 2.0.
In short, parse SDK v2.0 removes the backbone style callbacks as well as the Parse.Promise object in favor of native promises.
All the Cloud Code interfaces also have been updated to reflect those changes, and all backbone style response objects are removed and replaced by Promise style resolution.
We have written up a migration guide, hoping this will help you transition to the next major release.
Want to ride the bleeding edge?
It is recommend to use builds deployed npm for many reasons, but if you want to use
the latest not-yet-released version of parse-server, you can do so by depending
directly on this branch:
Purpose
This is a universal, language-independent name parser.
Its purpose is to split a single string containing a full name,
possibly including salutation, initials, suffixes etc., into
meaningful parts like firstname, lastname, initials, and so on.
It is mostly tailored towards english names but works pretty well
with non-english names as long as they use latin spelling.
E.g. Mr Anthony R Von Fange III is parsed to
- salutation: Mr.
- firstname: Anthony
- initials: R
- lastname: von Fange
- suffix: III
This package has been used by The Iconic in production for years,
successfully processing hundreds of thousands of customer names.
Loading Files
You may also seamlessly load a file into the DOM instead of a string, which is much more convenient and is how I expect most developers will be loading the HTML. The following example is taken from our test and uses the «big.html» file found there.
// Assuming you installed from Composer:
require "vendor/autoload.php";
use PHPHtmlParser\Dom;

$dom = new Dom;
$dom->loadFromFile('tests/data/big.html');
$contents = $dom->find('.content-border');
echo count($contents); // 10

foreach ($contents as $content)
{
	// get the class attr
	$class = $content->getAttribute('class');

	// do something with the html
	$html = $content->innerHtml;

	// or refine the find some more
	$child   = $content->firstChild();
	$sibling = $child->nextSibling();
}
This example loads the html from big.html, a real page found online, and gets all the content-border classes to process. It also shows a few things you can do with a node but it is not an exhaustive list of the methods that a node has available.
Неправильная кодировка при использовании cURL
В настоящее время на большинстве сайтов используется кодировка UTF-8, с которой cURL прекрасно работает.
Но, например, при открытии некоторых сайтов:
curl http://z-oleg.com/
Вместо кириллицы мы увидим крякозяблы:
Кодировку можно преобразовать «на лету» с помощью команды iconv. Но нужно знать, какая кодировка используется на сайте. Для этого обычно достаточно заглянуть в исходный код веб-страницы и найти там строку, содержащую слово charset, например:
<meta http-equiv="Content-Type" content="text/html; charset=utf-8">
Эта строка означает, что используется кодировка windows-1251.
Для преобразования из кодировки windows-1251 в кодировку UTF-8 с помощью iconv команда выглядит так:
iconv -f windows-1251 -t UTF-8
Совместим её с командой curl:
curl http://z-oleg.com/ | iconv -f windows-1251 -t UTF-8
После этого вместо крякозяблов вы увидите русские буквы.
Custom Parsers/Formatters
You can make your own custom parsers/formatters by implementing FormatInterface, the below example demostrates the use of a custom parser/formatter.
use Nathanmac\Utilities\Parser\Formats\FormatInterface;

/**
 * Custom Formatter
 */

class CustomFormatter implements FormatInterface {
    /**
     * Parse Payload Data
     *
     * @param string $payload
     *
     * @return array
     *
     * @throws ParserException
     */
    public function parse($payload)
    {
        $payload; // Raw payload data

        $output = // Process raw payload data to array

        return $output; // return array parsed data
    }
}
Using the CustomFormatter
use Acme\Formatters\CustomFormatter;

$parser = new Parser();
$parsed = $parser->parse('RAW PAYLOAD DATA', new CustomFormatter());
Autodetecting the CustomFormatter
use Acme\Formatters\CustomFormatter;

$parser = new Parser();
$parser->registerFormat('application/x-custom-format', 'Acme\Formatters\CustomFormatter');
$parser->payload('application/x-custom-format');
Version 4.4.0 (2020-04-10)
Added
- Added support for passing union types in builders.
- Added end line, token position and file position information for comments.
- Added method to nodes.
Fixed
- Fixed generation of invalid code when using the formatting preserving pretty printer, and
inserting code next to certain nop statements. The formatting is still ugly though. -
no longer requires that the very last comment before a node be a doc comment.
There may not be non-doc comments between the doc comment and the declaration. - Allowed arbitrary expressions in and , rather than just variables.
In particular, this allows , which is legal PHP code.
Написание класса парсера
Теперь пришло время собрать все части спаршеных данных вместе. Логина по выполнению запроса может быть помещена в отдельную функцию/класс, а так же, нужно добавить более гибкую функциональность, добавив возможность указания разных URL-адресов. Для этого, создадим класс
Класс принимает объект как зависимость в свой конструктор. Функциональность этого класса достаточно проста: в нём существует 2 метода: — который принимает массив URL-адресов на фильмы, и , который возвращает массив всех спаршенных данных о фильмах.
Теперь, наконец-то, можем попробовать этот парсер в действии:
В этом коде мы создали объект парсера, передали его методу URL-адреса для парсинга, после чего, запустили обработчик цикла событий. События будут обрабатываться до тех пор, пока все запросы не будут выполнены, и результаты, в которых нуждаемся, не спаршены с HTML-разметки. Как результат, эти запросы выполняются параллельно, потому, итоговое время выполнения скрипта будет равно самому медленному из наших запросов.
Результат будет выглядеть примерно так:
Дальше вы можете продолжать писать парсер как угодно: разделив его на несколько файлов, добавить запись результатов в базу данных. Главная цель этой статьи была показать, как выполнять асинхронные запросы в PHP и обрабатывать ответ с помощью DOM-парсинга.
Usage
Basic usage
<?php

$parser = new TheIconic\NameParser\Parser();

$name = $parser->parse($input);

echo $name->getSalutation();
echo $name->getFirstname();
echo $name->getLastname();
echo $name->getMiddlename();
echo $name->getNickname();
echo $name->getInitials();
echo $name->getSuffix();

print_r($name->getAll());

echo $name;
An empty string is returned for missing parts.
Special part retrieval features
Explicit last name parts
You can retrieve last name prefixes and pure last names separately with
echo $name->getLastnamePrefix();
echo $name->getLastname(true); // true enables strict mode for pure lastnames, only
Nick names with normalized wrapping
By default, returns the pure string of nick names. However, you can
pass to have the same normalised parenthesis wrapping applied as in :
echo $name->getNickname(); // The Giant
echo $name->getNickname(true); // (The Giant)
Re-print given name in the order as entered
You can re-print the parts that form a given name (that is first name, middle names and any initials)
in the order they were entered in while still applying normalisation
via :
echo $name->getGivenName(); // J. Peter M.
Re-print full name (actual name parts only)
You can re-print the full name, that is the given name as above followed by
any last name parts (excluding any salutations, nick names or suffixes)
via :
echo $name->getFullName(); // J. Peter M. Schluter
Setting Languages
$parser = new TheIconic\NameParser\Parser([
    new TheIconic\NameParser\Language\English(), //default
    new TheIconic\NameParser\Language\German(),
])
Limiting the position of salutations
$parser = new TheIconic\NameParser\Parser();
$parser->setMaxSalutationIndex(2);
This will require salutations to appear within the
first two words of the given input string.
This defaults to half the amount of words in the input string,
meaning that effectively the salutation may occur within
the first half of the name parts.
Adjusting combined initials support
$parser = new TheIconic\NameParser\Parser();
$parser->setMaxCombinedInitials(3);
Combined initials are combinations of several
uppercased letters, e.g. or without
separating spaces. The parser will treat such sequences
of uppercase letters (with optional dots) as combined
initials and parse them into individual initials.
This value adjusts the maximum number of uppercase letters
in a single name part are recognised as comnined initials.
Parts with more than the specified maximum amount of letters
will not be parsed into initials and hence will most likely
be parsed into first or middle names.
The default value is 2.
To disable combined initials support, set this value to 1;
Private Tunnel
Tips
Provide clean input strings
If your input string consists of more than just the name and
directly related bits like salutations, suffixes etc.,
any additional parts can easily confuse the parser.
It is therefore recommended to pre-process any non-clean input
to isolate the name before passing it to the parser.
Multi-pass parsing
We have not played with this, but you may be able to improve results
by chaining several parses in sequence. E.g.
$parser = new Parser();
$name = $parser->parse($input);
$name = $parser->parse((string) $name);
...
You can even compose your new input string from individual parts of
a previous pass.
Dealing with names in different languages
The parser is primarily built around the patterns of english names
but tries to be compatible with names in other languages. Problems
occur with different salutations, last name prefixes, suffixes etc.
or in some cases even with the parsing order.
To solve problems with salutations, last name prefixes and suffixes
you can create a separate language definition file and inject it when
instantiating the parser, see ‘Setting Languages’ above and compare
the existing language files as examples.
To deal with parsing order you may want to reformat the input string,
e.g. by simply splitting it into words and reversing their order.
You can even let the parser run over the original string and then over
the reversed string and then pick the best results from either of the
two resulting name objects. E.g. the salutation from the one and the
lastname from the other.
The name parser has no in-built language detection. However, you may
already ask the user for their nationality in the same form. If you
do that you may want to narrow the language definition files passed
into the parser to the given language and maybe a fallback like english.
You can also use this information to prepare the input string as outlined
above.
Alternatively, Patrick Schur as a PHP language detection library
that seems to deliver astonishing results. It won’t give you much luck if
you run it over the the name input string only, but if you have any more
text from the person in their actual language, you could use this to detect
the language and then proceed as above.
Gender detection
Gender detection is outside the scope of this project.
Detecting the gender from a name often requires large lists of first
name to gender mappings.
However, you can use this parser to extract salutation, first name and
nick names from the input string and then use these to implement gender
detection using another package (e.g. this one) or service.
Having fun with normalisation
Writing different language files can not only be useful for parsing,
but you can remap the normalised versions of salutations, prefixes and suffixes
to transform them into something totally different.
E.g. you could map to and then output
the parts in appropriate order to build a pipeline that automatically transforms
e.g. into .
Of course, this is a silly and rather contrived example, but you get the
gist.
Of course this can also be used in more useful ways, e.g. to spell out
abbreviated titles, like as etc. .
Режим навигации
Маршруты — это хорошо, но главная фишка навигатора всё же в навигации. Чтобы она появилась, необходимо написать следующее:
CPNavigationSession — класс, с помощью которого можно отображать некоторые UI-элементы, необходимые только в режиме навигации.
Чтобы отобразить манёвр, необходимо:
После чего на экране магнитолы мы получим вот это:
Чтобы обновлять метраж до манёвра, необходимо:
10. Мэрилин Монро
Camel naming convertions
You can also call methods with W3C STANDARD camel naming convertions.
| Method | Mapping |
|---|---|
|
array $e->getAllAttributes () |
array $e->attr |
|
string $e->getAttribute ( $name ) |
string $e->attribute |
|
void $e->setAttribute ( $name, $value ) |
void $value = $e->attribute |
|
bool $e->hasAttribute ( $name ) |
bool isset($e->attribute) |
|
void $e->removeAttribute ( $name ) |
void $e->attribute = null |
|
element $e->getElementById ( $id ) |
mixed $e->find ( «#$id», 0 ) |
|
mixed $e->getElementsById ( $id ) |
mixed $e->find ( «#$id» ) |
|
element $e->getElementByTagName ($name ) |
mixed $e->find ( $name, 0 ) |
|
mixed $e->getElementsByTagName ( $name ) |
mixed $e->find ( $name ) |
|
element $e->parentNode () |
element $e->parent () |
|
mixed $e->childNodes ( ) |
mixed $e->children ( ) |
|
element $e->firstChild () |
element $e->first_child () |
|
element $e->lastChild () |
element $e->last_child () |
|
element $e->nextSibling () |
element $e->next_sibling () |
|
element $e->previousSibling () |
element $e->prev_sibling () |
Author: S.C. Chen (me578022@gmail.com)
Original idea is from Jose Solorzano’s HTML Parser for PHP 4.
Contributions by: Contributions by: Yousuke Kumakura, Vadim Voituk, Antcs
Разбор файла в PHP — выводы
Как я уже и говорил в начале, мои опыты не являются безупречными и опираться исключительно на полученные в их ходе результаты не стоит, т.к., несмотря на быстродействие file_get_contents() в моей ситуации, бывают случаи, когда намного удобнее и эффективнее использовать другие приведённые мною PHP парсеры файлов.
Кроме того, не стоит забывать, что PHP сам по себе является синхронным языком программирования, т.е. все серверные операции происходят последовательно без возможности настройки их параллельного выполнения, в том числе, и на разных ядрах серверного процессора.
Следовательно, на время выполнения операций, прописанных в PHP коде, может влиять целый ряд факторов, среди которых основным является нагруженность ядра в момент работы PHP приложения.
Я это особенно ощутил во время проведения опытов, когда один и тот же PHP парсер файла отработал за 9, затем за 12, а потом снова за 9 секунд на трёх последовательных итерациях из-за банального запуска проводника Windows во время второго случая, который, естественно, тоже требует серверных ресурсов.
Учитывая данные особенности, я проводил эксперименты практически одновременно, друг за другом, при одинаковом комплекте запущенных программ, чтобы не распылять ресурсы серверного железа.
Поэтому в дальнейшем, при проведении подобных экспериментов с PHP конструкциями действуйте аналогичным образом, т.к. это, по сути, единственный способ привести эксперименты к равным условиям.
Если же вы будете работать с асинхронными серверными языками (C#, Java) или технологиями (Node.js, например), то, по возможности, для экспериментов создавайте отдельный поток, который будет работать на выделенном ядре процессора.
Ну, а если найти полностью незадействованное ядро не получится (что при уровне современного ПО не удивительно), то вы хотя бы сможете найти самое слабонагруженное или, хотя бы, со статической нагрузкой, которая не меняется во времени.
Надеюсь, что мои наблюдения и рекомендации будут вам полезны, равно как и мои сегодняшние эксперименты с PHP парсерами файлов.
Подытоживая, хочу сказать, что приведённые в статье фрагменты кода могут использоваться не только для парсинга текстовых файлов в PHP, но и отлично подойдут для других форматов, например, для разбора CSV файлов дампа базы данных MySQL.
До новых встреч!