Gamemaker studio 2.3: new gml features
Содержание:
- Maths
- Расширения
- Где я могу получить GameMaker: Studio?
- Учебные ресурсы
- Arrays
- Версии приложения
- Chained Accessors
- Особенности
- GPU functions
- Summary
- Обучение GameMaker: Studio
- Animation Curves
- Для кого предназначен движок GameMaker: Studio?
- Runtime Changes
- Light functions
- Camera functions
- View Ports
- Установка русификатора
- Заключение
Maths
- matrix_build_identity() — return an identity matrix
- matrix_build_lookat(xfrom,yfrom,zfrom,xto,yto,zto,xup,yup,zup) — builds a «look-at» (view) matrix for a camera at position (xfrom, yfrom, zfrom) and looking at a point (xto, yto, zto) with an up vector of (xup, yup, zup)
- matrix_build_projection_ortho(width,height,znear,zfar) — build an orthographic projection matrix with width, height and a z range from znear to zfar
- matrix_build_projection_perspective(width,height,znear,zfar) — build a perspective matrix with width, height and a z range from znear to zfar
- matrix_build_projection_perspective_fov(fov_y,aspect,znear,zfar)- build a perspective matrix with field of view ange fov_y and an aspect ration and a z range from znear to zfar
- matrix_transform_vertex(matrix, x, y, z, ) — multiply the given vector (x,y,z,w) by the matrix NOTE: if no w component given then it is treated as 1
- matrix_stack_push(optional_matrix) — push matrix onto the matrix stack
- matrix_stack_pop() — pop matrix from the top of the matrix stack
- matrix_stack_set(matrix) — set the given matrix as the top of the matrix stacl
- matrix_stack_clear() — clear the matrix stack
- matrix_stack_top() — return the value at the top of the matrix
- matrix_stack_is_empty() — return true if matrix stack is empty, false otherwise
Расширения
Если вам не хватает встроенных функций движка GameMaker, не волнуйтесь; он расширяемый! Бесплатная версия не позволяет использовать расширения, но в платной версии это возможно.
Что могут делать расширения?
Расширения добавляют новую функциональность, изначально не предусмотренную YoYo games. Вот некоторые примеры:
GiiMote — позволяет разработчику интегрировать WiiMote элементы управления в свою игру, добавляя функции, которые опрашивают состояние WiiMote (положение и нажатие кнопок).
FX Creator Extension — упрощает создание таких эффектов, как погода, лучи и брызги воды.
Взаимодействие с базами данных с помощью SQL — позволяет вашей игре подключиться к базе данных SQL, получить данные в виде строки, а затем использовать их в игре. Расширение
добавляет такие функции, как и так, что вы можете получить данные обратно в виде двух строк кода.
Одно серьезное ограничение — некоторые расширения несовместимы с мобильными платформами.
Как их установить
- Необходимо загрузить расширение — это должен быть файл .
- Щелкните правой кнопкой мыши папку Extensions в GM:S и выберите Add Existing Extension.
- Это должно вызвать диалоговое окно, и в правом нижнем углу вы увидите кнопку с надписью Install. Нажмите ее.
- Откроется другое диалоговое окно со списком установленных пакетов (возможно, пустым). Справа от этого окна есть кнопка, которая снова с надписью Install. Нажмите ее.
- Это открывает еще одно диалоговое окно; перейдите в папку, в которой сохранен файл , щелкните его и нажмите кнопку Open.
Где я могу получить GameMaker: Studio?
Основной сайт движка GM:S — это http://www.yoyogames.com/. Вы можете загрузить бесплатную версию или приобрести одну из лицензионных версий.
Ниже приведено сравнение различных версий GameMaker, взятых с веб-сайта YoYo Games:
Как вы видите, бесплатная версия (Studio) довольно ограничена, но это отличный способ увидеть рабочий процесс и расположение инструментов, а также потратить некоторое время на изучение языка.
Обновление: Бесплатная версия GameMaker: Studio теперь та же, что и стандартная версия! Для получения дополнительной информации см. GameMaker: Studio будет бесплатной.
Стандартная версия отлично подходит для разработчиков одиночек, которые только планируют разработку компьютерных игр; Профессиональная версия идеально подходит для небольшой команды разработчиков планирующих переходить в конечном итоге на кроссплатформенную разработку, поскольку они могут добавлять различные модули с течением времени после получения некоторого дохода; и Master Collection отлично подойдет для небольших команд, которые являются частью созданных студий, и хотели бы использовать кроссплатформенную разработку с самого начала.
GM:S также
доступен в Steam, но я бы рекомендовал не покупать его там, так как
YoYo Games не знает, что вы его приобрели, и,
следовательно обладателям их продукта будет больше хлопот в отделе обслуживания клиентов. Кроме
того, они иногда предлагают дешевые апгрейды для тех, у кого уже есть определенная версия GM:S, и они не могут дать то же обновление пользователям купившим в Steam. Кроме того, если вы покупаете у Steam, то необходимо войти в Steam, чтобы запустить GM:S, а это может раздражать.
Учебные ресурсы
Уроки инди-разработчиков
Список уроков Chevy Ray — Chevy Ray является разработчиком Flash-игрового движка FlashPunk, частый соперник на Ludum Dare и разработчик нескольких классных игр. Он написал несколько уроков по GameMaker, и это подборка тех его материалов, которые он считает лучшими. Уроки охватывают такие темы, как масштабирование вида, оптимизация скорости, параллакс-скроллинг.
Серия уроков Derek Yu’s — Derek Yu является членом TIGSource и разработчиком Spelunky. Эта серия уроков для более старой версии GameMaker, но вы по-прежнему можете легко пройти ее. Это полное пошаговое руководство по созданию космической сайд-скроллер стрелялки; по мере создания вы узнаете, как работают игровые объекты, как создавать прокручивающиеся фоны, как создавать спрайт шрифты и множество других замечательных тем. Обязательно к прочтению.
Другие уроки и руководства
Официальные уроки — официальные уроки посвящены созданию нескольких игр разных стилей (некоторые из них 3D-игры, поэтому эти уроки могут быть особенно глубокими, если вы будете использовать GM:S). Кроме того, имеется урок по созданию многопользовательских игр, который, по моему мнению, является одним из лучших в Интернете по изучению создания многопользовательской игры в GM:S.
Я рекомендую их для людей, которые хотят разработать определенный тип игры и желают узнать как разрабатывать игры подобного типа, но если вы ищете урок для начинающих, я рекомендую уроки Derek Yu’s.
Также ознакомьтесь с официальными и неофициальными руководствами, поскольку они дают большой справочный материал.
Arrays
The first change to the GameMaker language that we want to discuss is a change to how arrays work. Previously, GML only permitted 1D or 2D arrays, eg:
However, this is no longer the case and now all arrays are 1D. So how do we create a 2D array now? Well this is done by chaining arrays together to essentially create arrays within arrays. Here is a small example:
The above is now a multi-dimension array with 2 dimensions to it, but you are no longer limited to just 2 dimensions and can create arrays of 3 or 4 or more dimensions as required, eg:
This change means that all platforms will now work the same (including HTML5) and enables much larger arrays, both in number of items as well as number of dimensions. The change also means that the following functions have been deprecated:
And the following new functions have been added:
Note that the old functionality (and the deprecated functions mentioned above) will still work but under no circumstances should new projects use the old syntax, as these will eventually be removed from the language.
Версии приложения
Изначально была одна версия программы, но впоследствии приложение разделилось на две редакции: упрощенную (Lite) и профессиональную (Pro). Профессиональная версия расширяет возможности игрового редактора, добавляя, например, функции:
- создания многопользовательского режима;
- импортирования и экспортирования ресурсов для совмещения разных проектов;
- продвинутого редактирования изображений и анимаций;
- расширенных средств программирования.
Профессиональная редакция также может работать в Windows 7 и других версиях. При запуске в ней отсутствуют всплывающие надписи, призывающие к обновлению до версии Pro, а в создаваемых программах нет логотипов.
Разделение приложения на Lite и Pro актуально для версии 8.0.
Chained Accessors
Another change to GML is the ability to chain accessors. Much like you can now chain arrays together, you can chain the different Data Structure accessors together too, making accessing the data from nested structures much easier.
A simple example of this would be a DS grid, where each grid entry is a ds list. Previously you’d have to first retrieve the index of the list from the grid, and then access the data in the list, but now it’s as simple as doing something like this:
This would retrieve the data from the 6th position in the DS list that is being held in the grid (0, 0) position. Other examples of use are:
Особенности
GameMaker: Studio позволяет писать расширения под множество платформ на соответствующих им языках. Поддерживаются следующие типы файлов расширений: gml везде, dll-библиотеки на Windows, Windows Phone, Xbox One, js-скрипты для HTML5, so-библиотеки на Linux и Tizen, dylib-библиотеки на Mac, prx на PS4, suprs на PSVita, а также специальные placeholder для iOS и Android. Есть возможность создать прокси-расширения для проектов на многих платформах, что позволяет использовать одинаковые названия функций в коде, но обращаться к библиотекам соответствующей платформы.
Имеются функции для работы с кодировками Base64, JSON, MD5, SHA-1, возможности распаковки ZIP-архивов, чтения и записи .ini, текстовых и двоичных файлов, управления каталогами. Есть возможность взаимодействовать с сетью: коллективная игра по UDP, TCP, Bluetooth, отправка http-запросов, загрузка любых файлов, взаимодействие со Steam API и .
С версии 1.1.1086 добавлена поддержка шейдеров — эффективного инструмента управления отрисовкой, добавления графических эффектов и преобразований. GameMaker: Studio поддерживает вершинные и фрагменты шейдеры на языках GLSL ES, HLSL9, HLSL11 и GLSL.
Из устройств, помимо мыши и клавиатуры, присутствуют функции для взаимодействия с джойстиками и геймпадами, для обработки касаний и наклона на смартфонах.
GameMaker: Studio содержит множество математических функций для работы со скалярными и векторными величинами, включая тригонометрические вычисления, нахождение степеней, логарифмов, интерполяций, нормалей векторов, скалярных произведений. Имеется встроенный физический движок Box2D, набор функций для работы с ним, демонстрационные проекты Angry Cats и Angry Cats Space.
В отличие от GameMaker, Studio использует компилятор, а не интерпретатор кода, что убрало возможность выполнения чистого кода «на лету», но существенно увеличило производительность игр. Также есть дополнительный модуль YoYoCompiler, транслирующий GML-код в C++ и оптимизирующий его. Проекты, собранные с использованием этого компонента, показывают хорошую производительность с сотнями игровых элементов на уровне. Однако этот модуль доступен не для всех платформ.
Присутствует поддержка многих сервисов монетизации (таких как AdMob, Google Analytics, Google Play Licensing) из кода. Также имеется поддержка систем управления версиями — есть примеры интеграции с SVN, GIT, Mercurial.
В последних версиях появилось множество опций отладки программ в новом окне The Debug Module, позволяющих ставить точки остановки, следить за выполнением кода, значениями любых переменных, конкретных объектов, содержимым буферов, количеством и временем выполнения разных скриптов.
GPU functions
- gpu_set_blendenable(enable) — enable or disable the gpu blending
- gpu_set_ztestenable(enable) — enable or disable the gpu ztest
- gpu_set_zfunc(cmp_func) — set the gpu z compare function (one of cmpfunc_never, cmpfunc_less, cmpfunc_equal, cmpfunc_lessequal, cmpfunc_greater, cmpfunc_notequal, cmpfunc_greaterequal, cmpfunc_always, default is cmpfunc_lessequal)
- gpu_set_zwriteenable(enable) — enable or disable the gpu z write enable
- gpu_set_fog(enable,col,start,end) — enable or disable the fog used in the default shader setting the colour and the start and end depths
- gpu_set_cullmode(cullmode) — set the gpu cull mode (one of cull_noculling, cull_clockwise, cull_counterclockwise)
- gpu_set_blendmode(mode) — set the gpu blend mode (one of bm_normal, bm_add, bm_max, bm_subtract)
- gpu_set_blendmode_ext(src,dest) — set the gpu blend mode where source or dest could be (one of bm_zero, bm_one, bm_src_colour, bm_inv_src_colour, bm_src_alpha, bm_inv_src_alpha, bm_dest_alpha, bm_inv_dest_alpha, bm_dest_colour, bm_inv_dest_colour, bm_src_alpha_sat)
- gpu_set_blendmode_ext_sepalpha(src,dest,srcalpha,destalpha) — set the gpu blend mode where the source and destination blendmodes are set separately and the src alpha and dest alpha blend modes can be different (each param is one of bm_zero, bm_one, bm_src_colour, bm_inv_src_colour, bm_src_alpha, bm_inv_src_alpha, bm_dest_alpha, bm_inv_dest_alpha, bm_dest_colour, bm_inv_dest_colour, bm_src_alpha_sat)
- gpu_set_alphatestenable(enable) — enable or disable the gpu alpha test
- gpu_set_alphatestref(value) — set the gpu alpha test reference value (default value is 0)
- gpu_set_texfilter(linear) — set the gpu filter type for default sampler (0)
- gpu_set_texfilter_ext(sampler_id,linear) — set the gpu filter type for specified sampler
- gpu_set_texrepeat(repeat) — enable or disable the gpu texture repeat for the default sampler (NOTE: sets both u and v repeats)
- gpu_set_texrepeat_ext(sampler_id,repeat)- enable or disable the gpu texture repeat for the specified sampler (NOTE: sets both u and v repeats)
- gpu_set_colourwriteenable(red,green,blue,alpha) — enable or disable the gpu writing to destination channels individually
- gpu_set_colorwriteenable(red,green,blue,alpha) — enable or disable the gpu writing to destination channels individually
- gpu_get_blendenable() — get the current state of gpu blending
- gpu_get_ztestenable() — get the current state of gpu z test
- gpu_get_zfunc() — get the current value for gpu z function
- gpu_get_zwriteenable() — get the current state of gpu z writing
- gpu_get_fog() — get the current state of gpu fog (returns an array with entries — enable/disable, -colour, — start value, — end value)
- gpu_get_cullmode() — get the current value for the gpu cullmode
- gpu_get_blendmode() — get the current gpu blendmode value
- gpu_get_blendmode_ext() — get the current gpu blendmode (array with — src blend, — dest blend)
- gpu_get_blendmode_ext_sepalpha() — get the current gpu blendmode (array with — src blend, — dest blend, — src alpha blend, — dest alpha blend)
- gpu_get_blendmode_src() — get the current gpu source blend value
- gpu_get_blendmode_dest() — get the current gpu destination blend value
- gpu_get_blendmode_srcalpha() — get the current gpu source alpha blend value
- gpu_get_blendmode_destalpha() — get the current gpu destination alpha blend value
- gpu_get_alphatestenable() — get the current status of gpu alpha enable/disable
- gpu_get_alphatestref() — get the current gpu alpha test reference value
- gpu_get_texfilter() — get the current gpu texture filter status for default sampler (0)
- gpu_get_texfilter_ext(sampler_id) — get the current gpu texture filter status for specified sampler
- gpu_get_texrepeat() — get the current status gpu texture repeat for default sampler
- gpu_get_texrepeat_ext(sampler_id) — get the current status gpu texture repeat for specified sampler
- gpu_get_colorwriteenable() — get the current state of the gpu color write enable (array with — red, — green, — blue, — alpha)
- gpu_get_colourwriteenable() — get the current state of the gpu colour write enable (array with — red, — green, — blue, — alpha)
- gpu_push_state() — push the current gpu state onto an internal gpu state stack
- gpu_pop_state() — pop the entry from the top of the gpu state stace and make it current
- gpu_get_state() — get the current gpu state as a map (returns a map id)
- gpu_set_state(map) — set the current gpu state to the state stored in given map
Summary
Well, we’ve come to the end of this rather long blog post, and as you can see we’ve been working hard to improve the GameMaker Language and bring it up to par with other more common programming languages, We hope that these new features are of use to you, and that they help your workflow and enable you to make bigger and better games! Note that all the features discussed here are available from GameMaker Studio 2.3 onwards, and we recommend that you read the manual fully before using any of them, as there are details and nuances related to their use that we just haven’t got the space to talk about here. Also note that the 2.3 update includes a number of changes and improvements to the GameMaker Studio IDE which we’ll discuss a separate blog post.
Happy GameMaking!
Обучение GameMaker: Studio
GM:S предлагает два различных способа создавать игры. Первый это так называемый интерфейс Drag and Drop (сокращённо DnD). Он довольно мощный и позволяет создавать сложную логику. Однако, он не такой мощный, как второй вариант: использование языка программирования GameMaker Language (сокращённо GML). GML — это прекрасный язык сценариев, который может делать все, что может делать DND, и многое другое.
Начало работы
После того, как
вы загрузили версию движка GM:S которая соответствует вашим потребностям, вам следует ознакомиться с учебными материалами,
которые поставляются вместе с GM:S. Их можно найти во вкладке Tutorials после того, как вы откроете GM:S.
В начале уроков будет показано, как использовать drag and drop интерфейс, а более поздние руководства начинают охватывать язык программирования GML. Самое приятное в предложенных уроках — это то, что они фактически добавляют окно к
интерфейсу, в котором вы узнаете, как создавать каждую игру, поэтому вам
не нужно обращаться к веб-странице — все доступно изложено для вас в GM:S!
Я рекомендую
проработать столько, сколько вам нужно, до тех пор, пока вы не
почувствуете, что у вас есть четкое представление об общем процессе
работы и инструментах, которые предлагает движок GM:S. Дополнительные уроки вы можете найти на вики сайте YoYo games по адресу http://wiki.yoyogames.com/index.php/GameMaker:Studio_Tutorials включая некоторые более продвинутые руководства.
Для самого продвинутого обучения можно посмотреть демки на вкладке Demos после запуска GM:S. Они не откроют окно обучения, но они предоставляют доступ ко всему используемому исходному коду, чтобы можно было просматривать его, запускать отладчик и наблюдать за тем, что происходит, так что вы получите хорошее представление как использовать их методы в своих играх.
Руководство
Руководство по GM:S можно найти в меню Help в разделе Contents…. Это должно быть первым местом, где вы будете искать ответы на свои вопросы, если сразу перейти на форумы, люди по всей вероятности огорчат вас за то, что вы просто не проверили справку. Существует также онлайн-руководство, которое можно найти по адресу docs.yoyogames.com
Руководство в программе GM:S
Если вы выполняете поиск как в прилагаемом руководстве, так и в онлайн-руководстве и не можете найти ответы, не бойтесь! На reddit существует большое сообщество /r/gamemaker и есть официальные форумы. Кроме того, имеется отличный сайт полон инди-разработчиков, некоторые из них часто используют GM:S на форумах TIG. Эти сообщества полны полезных людей, поэтому не бойтесь задавать свои вопросы!
Animation Curves
The next new feature we want to discuss here is a new top-level resource called Animation Curves. An animation curve is an asset that contains one or more curves that represent how a value changes over time, and can use linear interpolation or smooth interpolation to go between different points in the curve. The values you set can be between -1 and 1 (by default) on the vertical axis and the duration along the horizontal axis is always normalised form 0 to 1, making it easy to target different time ranges using multipliers in your game code.
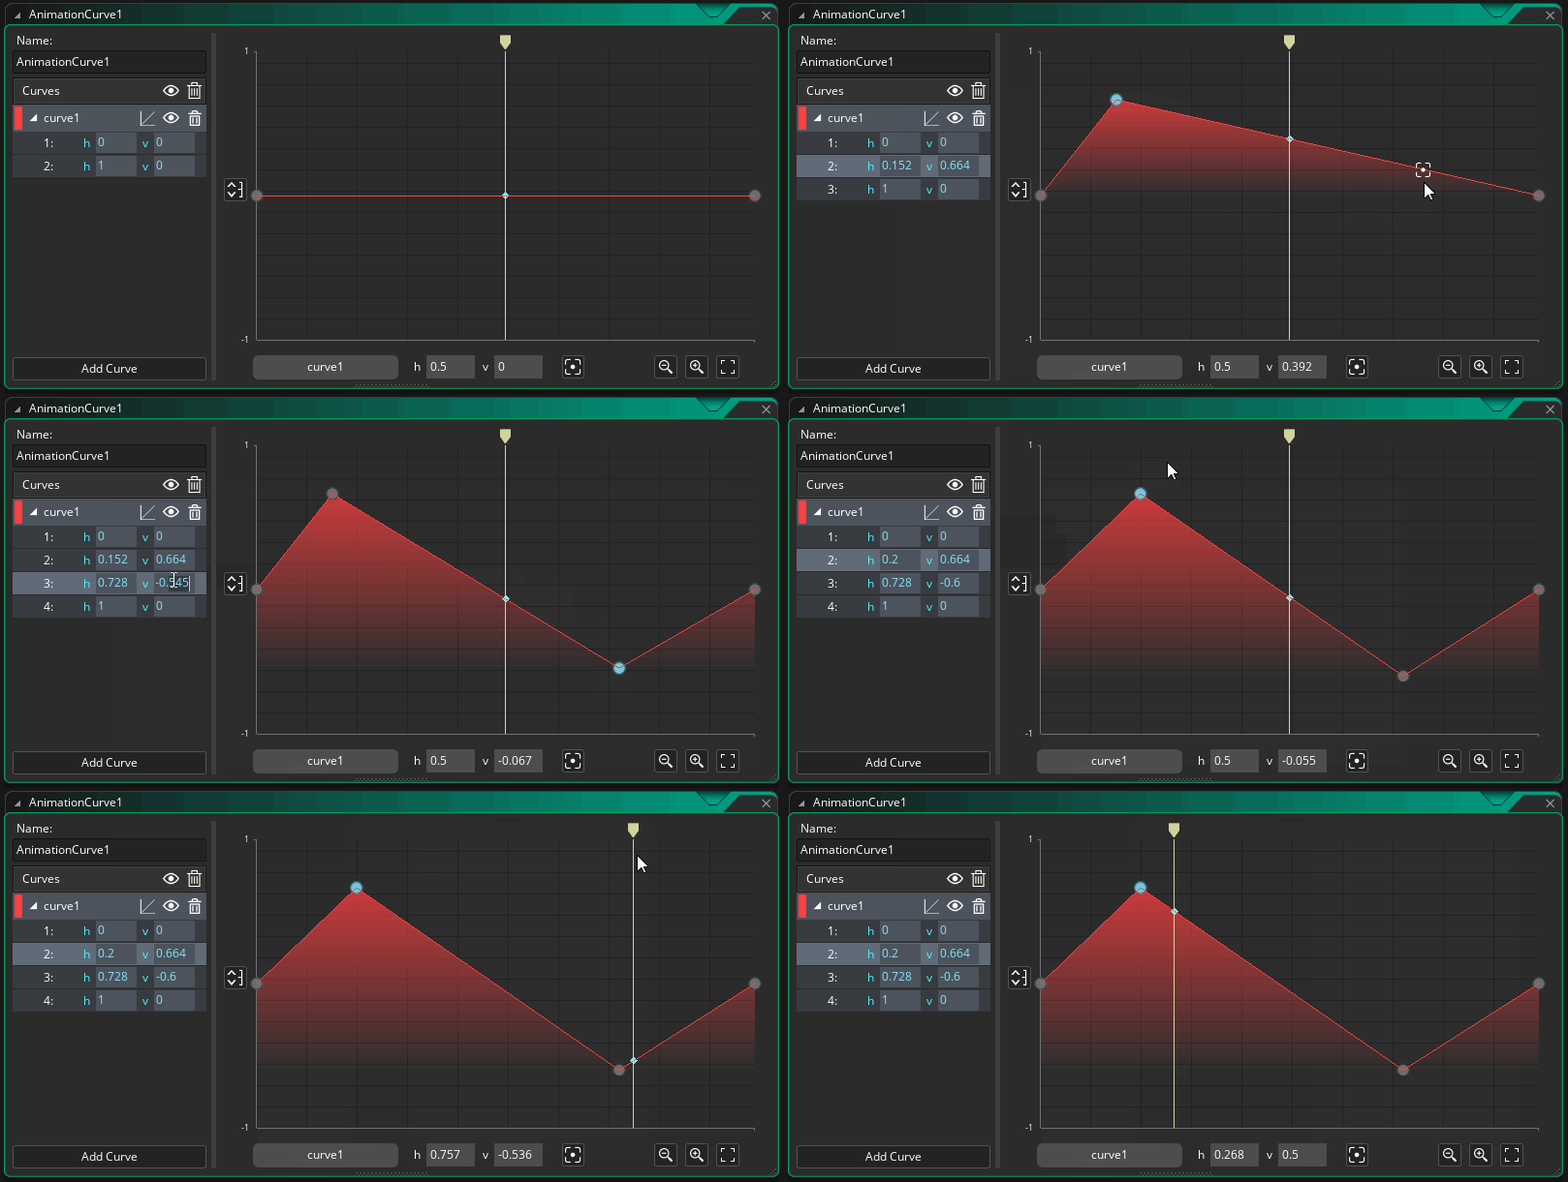
Animation curves are comprised of «channels» and each channel can have its own curve settings, which permits you to — for example — describe a spacial position with two channels for the x/y position, or a colour gradient with 4 channels to represent a colour format. Animation curve assets can be used when working with sequences and can also be accessed using code, making them a powerful tool when creating your games.
Для кого предназначен движок GameMaker: Studio?
В Master коллекции движка GM:S реализована кроссплатформенная совместимость для настольных компьютеров, HTML5 и мобильных устройств (как для Android, так и для iOS). Кроме того, имеется возможность интеграции системы управления версиями и монетизации (например, реклама и покупки в приложении). Общая стоимость master коллекции составляет около $800 долларов на момент написания этой статьи. Поэтому этот движок идеален для:
- Любого желающего кто интересуется кроссплатформенной разработкой
- Инди-команд разработчиков с небольшим бюджетом
Низкий порог вхождения в GM:S возможен благодаря интеграции drag-and-drop интерфейса. Таким образом, это фантастический инструмент для людей с небольшими знаниями программирования в качестве первого опыта; этот интерфейс является отличным способом изучить процесс выполнения программы и некоторую базовую логику.
Благодаря своим возможностям управления, GM:S позволяет разработчикам быстро создавать и запускать очень простые игры, что отлично подходит для игровых джемов и создания игровых прототипов.
Runtime Changes
Many functions have been added in GameMaker Studio 2, the following sections outline those that have been added and those that have been removed, please consult the manual (Help -> Open Manual) for further info.
Our Windows Desktop Runner has also changed from using DX9 to using DX11 this may mean that there are some compatibility issues that may need to be addressed, there are some known issues at present
- No Anti Aliasing implemented — all functions return 0 for the number of anti aliasing levels, we will implement this in the future
- Line drawing — unfortunately line drawing is not consistently implemented by hardware vendors, this means that between different manufacturers and different drivers from the same manufacturer you may get different results, we reccomend that you do not rely on line drawing in released games, but the functions are still there for you to try.
- Windows XP is no longer supported for games created using GameMaker Studio 2.
Light functions
- draw_light_define_ambient(col) — set the ambient light colour for lighting, replacement for d3d_light_define_ambient
- draw_light_define_direction(ind,dx,dy,dz,col) — set the light ind as a directional light for a given directional vector with colour, replacement for d3d_light_define_direction
- draw_light_define_point(ind,x,y,z,range,col) — set the light ind as a point light for a given position and range with colour, replacement for d3d_light_define_point
- draw_light_enable(ind,enable) — enable or disable a specific light
- draw_set_lighting(enable) — enable or disable lighting
- draw_light_get_ambient() — get the ambient light colour
- draw_light_get(ind) — get the settings for a given light (returns array with — enabled/disabled, — light type (point or direction), — x, — y, — z, — w, — colour)
- draw_get_lighting() — current status of lighting (enabled or disabled)
Camera functions
- camera_create() — create a camera
- camera_create_view(room_x,room_y,width,height,angle,object,x_speed,y_speed,x_border,y_border) — create a camera with settings for a view in a room
- camera_destroy(camera) — destroy the given camera
- camera_apply(camera) — apply the camera settings to the current camera
- camera_get_active() — get the current active camera
- camera_get_default() — get the current default camera (camera used when there are no views active)
- camera_set_default(camera) — set the given camera as the default camera
- camera_set_view_mat(camera,matrix) — set the view matrix of the given camera
- camera_set_proj_mat(camera,matrix) — set the projection matrix of the given camera
- camera_set_update_script(camera,script) — set the update script to use on the given camera
- camera_set_begin_script(camera,script) — set the begin script to use on the given camera
- camera_set_end_script(camera,script) — set the end script to use on the given camera
- camera_set_view_pos(camera,x,y) — set the view position on the given camera
- camera_set_view_size(camera,width,height) — set the view size on the given camera
- camera_set_view_speed(camera,x_speed,y_speed) — set the view speed on the given camera
- camera_set_view_border(camera,x_border,y_border) — set view the border size on the given camera
- camera_set_view_angle(camera,angle)- set view the angle on the given camera
- camera_set_view_target(camera,object) — set the target object for the given camera
- camera_get_view_mat(camera) — get the view matrix for the given camera
- camera_get_proj_mat(camera) — get the projection matrix for the given camera
- camera_get_update_script(camera) — get the update script for the given camera
- camera_get_begin_script(camera) — get the begin script for the given camera
- camera_get_end_script(camera) — get the end script for the given camera
- camera_get_view_x(camera) — get the view pos x value for the given camera
- camera_get_view_y(camera) — get the view pos y value for the given camera
- camera_get_view_width(camera) — get the view width for the given camera
- camera_get_view_height(camera) — get the view height for the given camera
- camera_get_view_speed_x(camera) — get the view speed x for the given camera
- camera_get_view_speed_y(camera) — get the view speed y for the given camera
- camera_get_view_border_x(camera) — get the view border x for the given camera
- camera_get_view_border_y(camera) — get the view border y for the given camera
- camera_get_view_angle(camera) — get the view angle for the given camera
- camera_get_view_target(camera) — get the view target object for the given camera
View Ports
- room_set_viewport(room_ind,vind,vis,xport,yport,wport,hport) — set the viewport for a specific view in a specific room
- room_get_viewport(room_ind,vind) — get the viewport for a specific view in a specific room (returns array — xport, — yport, — wport, — hport)
- room_get_camera(room_ind,vind) — get the camera for a specific view in a specific room
- room_set_camera(room_ind,vind,camera) — set the camera for a specific view in a specific room
- view_get_camera(view) — get the camera for a view in the current room
- view_get_visible(view) — get the visible status for a the view in the current room
- view_get_xport(view) — get the xport for the view in the current room
- view_get_yport(view) — get the yport for the view in the current room
- view_get_wport(view) — get the wport for the view in the current room
- view_get_hport(view) — get the hport for the view in the current room
- view_get_surface_id(view) — get the surface_id for the requested view in the current room
- view_set_camera(view,camera) — set the camera for a view in the current room
- view_set_visible(view,visible) — enable or disable the visibility of a view in the current room
- view_set_xport(view,xport) — set the xport of the view in the current room
- view_set_yport(view,yport) — set the yport of the view in the current room
- view_set_wport(view,wport) — set the wport of the view in the current room
- view_set_hport(view,hport) — set the hport of the view in the current room
- view_set_surface_id(view,surface_id) — set the surface_id for the view in the current room
Установка русификатора
Для начинающих лучше будет установит русскоязычный интерфейс, чтобы проще ориентироваться. Для этого необходимо скачать файл русификатор, ссылка на который есть выше.
После того как скачали файл русского языка, копируем его и вставляем в директорию с Платформой в папку «Languages» которая лежит по следующему пути C:\Program Files\GameMaker Studio 2\Languages
Открываем вставленный файл в блокноте, для этого нажимаем на него правой кнопкой и выбираем пункт «Изменить».
Откроется блокнот с конфигурацией этого файла. Нам необходимо 7-й строкой вставить следующую конфигурацию.
_LanguageCode,ru,ru,,standard windows os language code this pack represents (can be primary code only ie. en or primary-secondary ie. ru-RU)
Сохраняем файл и делаем бэкап стандартного файла «english», для этого просто скопируйте его в другую папку. Это необходимо для того, если что-то пойдет не так, просто скопировать его обратно и вернуть исходный язык движка. После сохранения русскоязычного файла удаляем старый англоязычный (предварительно сохраненный в другую папку) и запускаем Game maker studio.
Заключение
Game Maker Studio — кроссплатформенный движок игр с легким освоением и подробной документацией. Программа предлагает интуитивно понятный и простой в использовании Drag-и-Drop (называется «DnD» теперь) Интерфейс «значки действий», которые позволят вам начать создавать свои собственные игры очень быстро. Вы можете импортировать и создавать образы и звуки для использования их в игре, а затем мгновенно увидеть результаты ваших действий при нажатии на кнопку. Следует отметить, что GameMaker: Studio заточен на двумерные игры, (но имеется так же базовая поддержка работы с 3d). С помощью D&D любой человек без знаний программирования может создать простенькую игру, на подобии Марио или Тетриса.