Руководство по повышению производительности при работе в visual studioproductivity guide for visual studio
Содержание:
- Содержание:
- Шаг 8. Начало разработкиStep 8 — Start developing
- Use the command line to create a local cache
- XamarinXamarin
- ПроектыProjects
- Использование рефакторинга и IntelliSenseUse refactoring and IntelliSense
- Add Code to the Application
- Visual Studio 2019 version 16.8.2
- Свойства проектаProject properties
- Из-за чего могут пропасть SMS
- Use the «Download all, then install» feature
- Использование режима «Скачать все и установить»Use the «Download all, then install» feature
- Совместная работаCollaborate
Содержание:
Шаг 8. Начало разработкиStep 8 — Start developing
-
Когда установка Visual Studio завершится, нажмите кнопку Запустить, чтобы приступить к разработке в Visual Studio.After Visual Studio installation is complete, choose the Launch button to get started developing with Visual Studio.
-
Выберите Файл, а затем Создать проект.Choose File, and then choose New Project.
-
Выберите тип проекта.Select a project type.
Например, чтобы создать приложение C++, нажмите Установленные, разверните узел Visual C++ , а затем выберите тип проекта C++, который нужно создать.For example, to build a C++ app, choose Installed, expand Visual C++, and then choose the C++ project type that you want to build.
Чтобы создать приложение C#, нажмите Установленные, разверните узел Visual C# , а затем выберите тип проекта C#, который нужно создать.To build a C# app, choose Installed, expand Visual C#, and then choose the C# project type that you want to build.
-
Когда установка Visual Studio завершится, нажмите кнопку Запустить, чтобы приступить к разработке в Visual Studio.After Visual Studio installation is complete, choose the Launch button to get started developing with Visual Studio.
-
На начальном экране выберите Создать проект.On the start window, choose Create a new project.
-
В поле поиска введите тип приложения, которое вы хотите создать, чтобы просмотреть список доступных шаблонов.In the search box, enter the type of app you want to create to see a list of available templates. Список шаблонов зависит от рабочих нагрузок, выбранных во время установки.The list of templates depends on the workload(s) that you chose during installation. Чтобы просмотреть различные шаблоны, выберите разные рабочие нагрузки.To see different templates, choose different workloads.
Можно также фильтровать поиск по определенному языку программирования с помощью раскрывающегося списка Язык.You can also filter your search for a specific programming language by using the Language drop-down list. Вы также можете выбирать фильтры из списка Платформа и Тип проекта.You can filter by using the Platform list and the Project type list, too.
-
Новый проект откроется в Visual Studio, и вы можете приступить к написанию кода!Visual Studio opens your new project, and you’re ready to code!
Use the command line to create a local cache
After you download a small bootstrapper, use the command line to create a local cache. Then, use the local cache to install Visual Studio. (This process replaces the ISO files that were available for previous versions.)
Here’s how.
Step 1 — Download the Visual Studio bootstrapper
You must have an internet connection to complete this step.
To get a bootstrapper for Visual Studio 2017, see the Visual Studio previous versions download page for details on how to do so.
Your setup executable—or to be more specific, the bootstrapper file—should match or be similar to one of the following.
| Edition | Filename |
|---|---|
| Visual Studio Community | vs_community.exe |
| Visual Studio Professional | vs_professional.exe |
| Visual Studio Enterprise | vs_enterprise.exe |
| Visual Studio Build Tools | vs_buildtools.exe |
Start by downloading the Visual Studio bootstrapper for your chosen edition of Visual Studio. Your setup file—or bootstrapper—will match or be similar to one of the following.
| Edition | File |
|---|---|
| Visual Studio Community | vs_community.exe |
| Visual Studio Professional | vs_professional.exe |
| Visual Studio Enterprise | vs_enterprise.exe |
| Visual Studio Build Tools | vs_buildtools.exe |
Tip
If you previously downloaded a bootstrapper file and want to verify its version, here’s how. In Windows, open File Explorer, right-click the bootstrapper file, choose Properties, choose the Details tab, and then view the Product version number. To match that number to a release of Visual Studio, see the Visual Studio build numbers and release dates page.
Step 2 — Create a local install cache
You must have an internet connection to complete this step.
Important
If you install Visual Studio Community, you must activate it within 30 days of installation. This requires an internet connection.
Open a command prompt and use one of the commands from the following examples. The examples that are listed here assume that you’re using the Community edition of Visual Studio; adjust the command as appropriate for your edition.
Tip
To prevent an error, make sure that your full installation path is less than 80 characters.
-
For .NET web and .NET desktop development, run:
-
For .NET desktop and Office development, run:
-
For C++ desktop development, run:
-
To create a complete local layout with all features (this will take a long time—we have lots of features!), run:
Note
A complete Visual Studio layout requires a minimum of 35 GB of disk space. For more information, see System requirements. And for information about how to create a layout with only the components you want to install, see Use command-line parameters to install Visual Studio.
Note
A complete Visual Studio layout requires a minimum of 35 GB of disk space. For more information, see System requirements. And for information about how to create a layout with only the components you want to install, see Use command-line parameters to install Visual Studio.
If you want to install a language other than English, change to a locale from the . Then, use the list of the components and workloads available to further customize your installation cache.
Step 3 — Install Visual Studio from the local cache
Tip
When you run from a local install cache, setup uses the local versions of each of these files. But if you select components during installation that aren’t in the cache, setup attempts to download them from the internet.
Important
For offline installations, if you get an error message that says «A product matching the following parameters cannot be found», make sure that you are using the switch with version 16.3.5 or later.
To make sure that you install only the files that you’ve previously downloaded, use the same command-line options that you used to create the layout cache. For example, if you created a layout cache with the following command:
Then use this command to run the installation:
For more examples of how to use command-line parameters, see the Command-line parameter examples for Visual Studio installation page.
Note
If you get an error that a signature is invalid, you must install updated certificates. Open the Certificates folder in your offline cache. Double-click each of the certificate files, and then click through the Certificate Manager wizard. If you’re asked for a password, leave it blank.
List of language locales
| Language-locale | Language |
|---|---|
| cs-CZ | Czech |
| de-DE | German |
| en-US | English |
| es-ES | Spanish |
| fr-FR | French |
| it-IT | Italian |
| ja-JP | Japanese |
| ko-KR | Korean |
| pl-PL | Polish |
| pt-BR | Portuguese — Brazil |
| ru-RU | Russian |
| tr-TR | Turkish |
| zh-CN | Chinese — Simplified |
| zh-TW | Chinese — Traditional |
XamarinXamarin
-
Комплексный набор элементов управления xplatComprehensive set of xplat controls
- Общедоступная версия AdaptiveTriggers/StateTriggers AdaptiveTriggers/StateTriggers GA
- Карауселвиев Дж CarouselView GA
- F100: добавление MediaElement F100: Add MediaElement
- Общедоступная версия IndicatorView IndicatorView GA
- RadioButton RadioButton
- Свипевиев Дж SwipeView GA
-
Ускорение разработки для всех мобильных платформ с помощью Горячего перезапускаBuild on all mobile platforms faster with Hot Restart
Горячая перезагрузка для приложений iOS в Visual Studio 2019Hot Restart for iOS applications in Visual Studio 2019
- Использование последних версий пакетов SDK для Android по умолчаниюUse the latest Android SDKs by default
ПроектыProjects
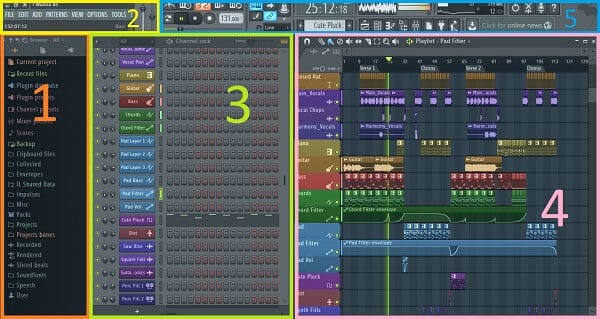
При создании в Visual Studio приложения или веб-сайта вы начинаете с проекта.When you create an app or website in Visual Studio, you start with a project. С логической точки зрения проект содержит все файлы, которые будут скомпилированы в исполняемую программу, библиотеку или веб-сайт.In a logical sense, a project contains all files that are compiled into an executable, library, or website. Сюда входят файлы с исходным кодом, значками, изображениями, данными и т. д.Those files can include source code, icons, images, data files, and so on. Проект также содержит параметры компилятора и другие файлы конфигурации, которые могут потребоваться разным службам или компонентам, с которыми взаимодействует программа.A project also contains compiler settings and other configuration files that might be needed by various services or components that your program communicates with.
Файл проектаProject file
Visual Studio использует MSBuild для создания каждого проекта в решении, и каждый проект содержит файл проекта MSBuild.Visual Studio uses MSBuild to build each project in a solution, and each project contains an MSBuild project file. Расширение имени файла отражает тип проекта, например проект C# (CSPROJ), проект Visual Basic (VBPROJ) или проект базы данных (DBPROJ).The file extension reflects the type of project, for example, a C# project (.csproj), a Visual Basic project (.vbproj), or a database project (.dbproj). Файл проекта представляет собой XML-документ, который содержит все сведения и инструкции, необходимые MSBuild для сборки проекта, включая содержимое, требования к платформе, сведения об управлении версиями, параметры веб-сервера или сервера баз данных, а также выполняемые задачи.The project file is an XML document that contains all the information and instructions that MSBuild needs in order to build your project, including the content, platform requirements, versioning information, web server or database server settings, and the tasks to perform.
Файлы проекта основаны на схеме XML MSBuild.Project files are based on the MSBuild XML schema. Чтобы просмотреть содержимое файлов проекта в новом стиле SDK в Visual Studio, щелкните правой кнопкой мыши узел проекта в обозревателе решений и выберите пункт Изменить <projectname> .To look at the contents of newer, sdk-style project files in Visual Studio, right-click on the project node in Solution Explorer and select Edit <projectname>. Чтобы просмотреть содержимое проекта .NET Framework или другого проекта в этом стиле, сначала выгрузите проект (щелкните правой кнопкой мыши узел проекта в обозревателе решений и выберите пункт Выгрузить проект).To look at the contents of .NET Framework and other projects of that style, first unload the project (right-click on the project node in Solution Explorer and select Unload Project). Затем щелкните проект правой кнопкой мыши и выберите пункт Изменить <projectname> .Then, right-click on the project and choose Edit <projectname>.
Примечание
Использовать решения или проекты в Visual Studio для редактирования, сборки и отладки кода необязательно.You don’t have to use solutions or projects in Visual Studio to edit, build, and debug code. Можно просто открыть папку с файлами исходного кода в Visual Studio и начать редактирование.You can simply open the folder that contains your source files in Visual Studio and start editing. Дополнительные сведения см. в статье Разработка кода в Visual Studio без использования проектов и решений.For more information, see Develop code in Visual Studio without projects or solutions.
Использование рефакторинга и IntelliSenseUse refactoring and IntelliSense
Рассмотрим несколько примеров того, как рефакторинг и IntelliSense помогают повысить эффективность кода.Let’s look at a couple of the ways that refactoring and IntelliSense can help you code more efficiently.
Во-первых, переименуем переменную :First, let’s rename the variable:
Дважды щелкните переменную , чтобы выбрать ее.Double-click the variable to select it.
Введите имя переменной, username .Type in the new name for the variable, username .
Обратите внимание, что вокруг переменной отображается серый прямоугольник, а в поле появляется значок лампочки.Notice that a gray box appears around the variable, and a light bulb appears in the margin.
-
Выберите значок лампочки для отображения доступных быстрых действий.Select the light bulb icon to show the available Quick Actions. Выберите Переименовать name в username .Select Rename ‘name’ to ‘username’ .
Переменная переименовывается во всем проекте, то есть в нашем случае только в двух местах.The variable is renamed across the project, which in our case is only two places.
Теперь рассмотрим возможности IntelliSense.Now let’s take a look at IntelliSense. Под строкой введите .Below the line that says , type .
Появится поле с членами класса DateTime.A box displays the members of the DateTime class. Кроме того, в отдельном поле отображается описание выбранного элемента.In addition, the description of the currently selected member displays in a separate box.
Выберите член с именем Now , который является свойством класса, дважды щелкнув его или нажав клавишу TAB . Завершите строку кода, добавив в конце точку с запятой.Select the member named Now , which is a property of the class, by double-clicking on it or pressing Tab . Complete the line of code by adding a semi-colon to the end.
Ниже введите или вставьте следующие строки кода:Below that, type in or paste the following lines of code:
Совет
Console.Write будет немного отличаться от Console.WriteLine в том, что не добавляет знак завершения строки после ее вывода.Console.Write is a little different to Console.WriteLine in that it doesn’t add a line terminator after it prints. Это означает, что следующий фрагмент текста, отправляемый на вывод, будет выводиться в той же строке.That means that the next piece of text that’s sent to the output will print on the same line. Можно навести указатель мыши на каждый из этих методов в коде, чтобы просмотреть его описание.You can hover over each of these methods in your code to see their description.
Далее мы снова используем рефакторинг, чтобы сделать код более кратким.Next, we’ll use refactoring again to make the code a little more concise
Щелкните переменную в строке .Click on the variable in the line .
Обратите внимание, что на поле в этой строке отображается маленький значок отвертки.Notice that a little screwdriver icon appears in the margin on that line.
Щелкните значок отвертки, чтобы увидеть предложения Visual Studio.Click the screwdriver icon to see what suggestions Visual Studio has available. В этом случае отображается рефакторинг Встроенная временная переменная для удаления строки кода без изменения его общего поведения:In this case, it’s showing the Inline temporary variable refactoring to remove a line of code without changing the overall behavior of the code:
Щелкните Встроенная временная переменная , чтобы выполнить рефакторинг кода.Click Inline temporary variable to refactor the code.
-
Снова запустите программу, нажав клавиши Ctrl+F5 .Run the program again by pressing Ctrl+F5 . Выходные данные выглядят следующим образом:The output looks something like this:
-
Снова запустите программу, нажав клавиши Ctrl+F5 .Run the program again by pressing Ctrl+F5 . Выходные данные выглядят следующим образом:The output looks something like this:
Add Code to the Application
Next, you’ll add code to display the word «Hello» in the console window.
To display “Hello” in the console window
-
In the GreetingsConsoleApp.cpp file, enter a blank line before the line and then enter the following code:
A red squiggly line appears under . An error message appears if you point to it.
The error message also appears in the Error List window. You can display the window by, on the menu bar, choosing View, Error List.
cout is included in the <iostream> header file.
-
To include the iostream header, enter the following code after :
You probably noticed that a box appeared as you entered code, providing suggestions for the characters that you entered. This box is part of C++ IntelliSense, which provides coding prompts, including listing class or interface members and parameter information. You can also use code snippets, which are pre-defined blocks of code. For more information, see Using IntelliSense and Code Snippets.
The red squiggly line under disappears when you fix the error.
-
Save the changes to the file.
Visual Studio 2019 version 16.8.2
released November 19, 2020
Issued Addressed in this Release of Visual Studio 2019 version 16.8.2
- Fixed for optimization bug in loops.
- Fixed internal compiler error in implementation of guaranteed copy elision (C++17 feature).
- Fixed build perf regression for large uses of anonymous types.
- Resolved an issue where a gold bar with the message «Specified argument was out of the range of valid values» would appear when editing C# code.
- Fixed an issue that could cause a MissingMethodException when building a project that had T4 templates.
- Fixes an issue where the search in the New Project Dialog could return zero results.
From Developer Community
- KeyNotFoundException reported by SolutionAssetStorage.GetAssetAsync results in gold bar
- IntelliSense fails because designtime build can’t find ‘GetClCommandLineForReference’ target
- IOException (Pipe is broken) reported by GetAssetAsync
- Search is not working
- Optimizer incorrectly removed EH information causing some exceptions to crash
Свойства проектаProject properties
Строка в файле Calendar.cs, содержащая атрибут InternalsVisibleToAttribute, ссылается на имя сборки (имя файла) проекта QuickTest.The line in the Calendar.cs file that contains the InternalsVisibleToAttribute attribute references the assembly name (file name) of the QuickTest project. Имя сборки может не всегда совпадать с именем проекта.The assembly name might not always be the same as the project name. Чтобы найти имя сборки проекта, откройте свойства проекта.To find the assembly name of a project, open the project properties.
Выберите проект QuickTest в Обозревателе решений.In Solution Explorer, select the QuickTest project. Выберите Свойства в контекстном меню или просто нажмите клавиши ALT+ВВОД.From the right-click or context menu, select Properties, or just press Alt+Enter.
Страницы свойств для проекта, открытые на вкладке Приложение. Страницы свойств содержат различные параметры для проекта.The property pages for the project open on the Application tab. The property pages contain various settings for the project
Обратите внимание, что имя сборки проекта QuickTest действительно имеет значение «QuickTest».Notice that the assembly name of the QuickTest project is indeed «QuickTest». Если вы хотите изменить его, это можно сделать здесь.If you wanted to change it, this is where you’d do that
Позже, при сборке тестового проекта, имя итогового двоичного файла изменится с QuickTest.dll на то, которое вы выбрали.Then, when you build the test project, the name of the resulting binary file would change from QuickTest.dll to whatever you chose.
!(media/tutorial-projects-netcore-properties.png «Диалоговое окно «Свойства проекта» в Visual Studio.»)
Изучите другие вкладки на страницах свойств проекта, такие как Сборка и Отладка.Explore some of the other tabs of the project’s property pages, such as Build and Debug. Эти вкладки отличаются для различных типов проектов.These tabs are different for different types of projects.
Из-за чего могут пропасть SMS
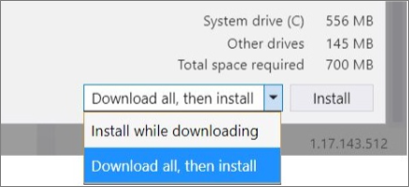
Use the «Download all, then install» feature
: After you download the web installer, select the new Download all, then install option from the Visual Studio Installer. Then, continue with your installation.
After you download the web installer, select the new Download all, then install option from the Visual Studio Installer. Then, continue with your installation.

We designed the «Download all, then install» feature so that you can download Visual Studio as a single installation for the same computer on which you downloaded it. That way, you can safely disconnect from the web before you install Visual Studio.
Important
Do not use the «Download all, then install» feature to create an offline cache that you intend to transfer to another computer. It’s not designed to work that way. If you want to create an offline cache to install Visual Studio on another computer, see the section of this page for information about how to create a local cache, or the Create a network installation of Visual Studio page for information about how to create a network cache.
Использование режима «Скачать все и установить»Use the «Download all, then install» feature
: Загрузив веб-установщик, выберите в Visual Studio Installer новый режим Скачать все и установить.: After you download the web installer, select the new Download all, then install option from the Visual Studio Installer. После этого продолжите установку.Then, continue with your installation.

загрузив веб-установщик, выберите в Visual Studio Installer новый режим Скачать все и установить.After you download the web installer, select the new Download all, then install option from the Visual Studio Installer. После этого продолжите установку.Then, continue with your installation.
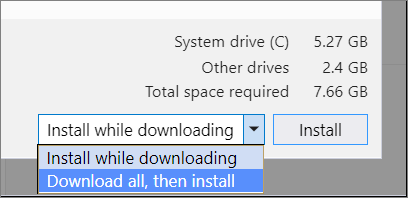
Режим «Скачать все и установить» позволяет скачать Visual Studio в виде отдельного установщика для компьютера, на который он скачивается.We designed the «Download all, then install» feature so that you can download Visual Studio as a single installation for the same computer on which you downloaded it. Это позволяет безопасно отключиться от Интернета перед установкой Visual Studio.That way, you can safely disconnect from the web before you install Visual Studio.
Важно!
Не используйте этот режим, чтобы создать автономный кэш для передачи на другой компьютер.Do not use the «Download all, then install» feature to create an offline cache that you intend to transfer to another computer. Он не предназначен для этого.It’s not designed to work that way. Вы можете создать автономный (локальный) кэш для установки Visual Studio на другом компьютере. Сведения о создании локального кэша см. в разделе этой статьи, а сведения о создании сетевого кэша — в статье Создание сетевой установки Visual Studio.If you want to create an offline cache to install Visual Studio on another computer, see the section of this page for information about how to create a local cache, or the Create a network installation of Visual Studio page for information about how to create a network cache.
Совместная работаCollaborate
Посмотрите видео ниже, чтобы узнать, как решать проблемы совместно с другими специалистами.View the following video to learn more about how you can team up to solve issues. Длительность видео: 4:22 мин.Video length: 4.22 minutes
Рабочий процесс Git-firstGit-first workflow
Первое, что вы заметите при открытии Visual Studio 2019, — новое окно запуска.Something you’ll notice when you open Visual Studio 2019 is its new start window.
С помощью этого окна запуска можно быстро перейти к коду несколькими способами.The start window presents you with several options to get you to code quickly. Мы включили возможность клонирования или извлечения кода из репозитория.We’ve placed the option to clone or check out code from a repo, first.
Окно запуска также позволяет открыть проект, решение и локальную папку или создать новый проект.The start window also includes options to open a project or solution, open a local folder, or create a new project.
Дополнительные сведения см. в записи блога Приступая к написанию кода: Как мы разработали новое окно запуска Visual Studio.For more information, see the Get to code: How we designed the new Visual Studio start window blog post.
Производительность GitGit productivity
Новое в 16.8 Теперь Git является интерфейсом системы управления версиями по умолчанию в Visual Studio 2019.New in 16.8 Git is now the default version control experience in Visual Studio 2019. Мы разработали набор функций на основе ваших отзывов за два прошлых выпуска.We have built out the feature set and iterated on it based on your feedback during the past two releases. Теперь новый интерфейс включен по умолчанию для всех пользователей.The new experience has now been turned on by default for everyone. В новом меню Git можно клонировать, создавать или открывать репозитории.From the new Git menu, you can clone, create, or open repositories. Используйте интегрированные окна инструментов Git для фиксации и отправки изменений в код, управления ветвями, отслеживания изменений удаленных репозиториев и разрешения конфликтов слияния.Use the integrated Git tool windows to commit and push changes to your code, manage branches, stay up to date with your remote repositories, and resolve merge conflicts.
Дополнительные сведения см. на странице Производительность Git в Visual Studio.For more information, see the Git productivity in Visual Studio page.
Visual Studio Live Share — это служба для разработчиков, которая позволяет предоставить базу кода и соответствующий контекст коллеге и обеспечить двунаправленное взаимодействие непосредственно из среды Visual Studio.Visual Studio Live Share is a developer service that allows you to share a codebase and its context with a teammate and get instant bidirectional collaboration directly from within Visual Studio. Благодаря Live Share коллега может легко и безопасно просматривать, изменять и отлаживать проект, предоставленный вами для общего доступа.With Live Share, a teammate can read, navigate, edit, and debug a project that you’ve shared with them, and do so seamlessly and securely.
В Visual Studio 2019 эта служба устанавливается по умолчанию.And with Visual Studio 2019, this service is installed by default.
Дополнительные сведения см. в разделе Visual Studio Live Share для проверки кода в режиме реального времени и интерактивного обучения записи блога и Live Share, теперь включены с помощью Visual Studio 2019 записи блога.For more information, see the Visual Studio Live Share for real-time code reviews and interactive education blog post and the Live Share now included with Visual Studio 2019 blog post.
Интегрированная проверка кодаIntegrated code reviews
Мы представляем новое расширение, которое можно скачать для использования в Visual Studio 2019.We’re introducing a new extension that you can download to use with Visual Studio 2019. С помощью этого нового расширения можно просматривать, запускать и даже выполнять отладку запросов на вытягивание, не выходя из Visual Studio.With this new extension, you can review, run, and even debug pull requests from your team without leaving Visual Studio. Мы включили поддержку кода в репозиториях GitHub и DevOps в Azure.We support code in both GitHub and Azure DevOps repositories.
Дополнительные сведения см. в записи блога Проверка кода с помощью расширения для запросов на вытягивание в Visual Studio.For more information, see the Code reviews using the Visual Studio Pull Requests extension blog post.