Знакомство с созданием изображений на чистом css. часть первая. для начинающих
Содержание:
- Назначение
- Menus
- CSS background-clip Property
- CSS Advanced Background Properties
- Оставить ответ
- HTML5 Element
- CSS Reference
- CSS Properties
- CSS Reference
- CSS Properties
- CSS Tutorial
- Image Sprites — Hover Effect
- Images
- Images
- Интерполяция
- Images
- HTML5 Element
- Responsive Image Gallery
- Использование атрибутов
- CSS Tutorial
- Menus
- Стимулирование использования этого решения
- Images
- Комментарии
- Положение фона
- Рисунок на поле
Назначение
Прежде чем рассматривать идеи для создания сайта, необходимо определиться с тем, с какой именно целью все это затевается. У человека много ненужных ему вещей и он хочет их поскорее продать? Или ему нужно в срочном порядке разрекламировать свой бизнес? Или он просто хочет поделиться с людьми своими мыслями и творчеством? Для каждой из этих целей необходимо выбрать определенный вид сайта.
В зависимости от того, с какой целью сайт задумывался, будут выбраны различные функции сайта. Стоит ли добавлять форум, смогут ли подписчики писать какие-то статьи и размещать их на сайте или это будет доступно только автору. Будет ли скрытая часть, доступная только избранным читателям. Нужна ли возможность создавать тесты. Со всеми этими вопросами нужно разобраться на самом начальном этапе, иначе потом придется все переделывать.
Menus
Icon BarMenu IconAccordionTabsVertical TabsTab HeadersFull Page TabsHover TabsTop NavigationResponsive TopnavNavbar with IconsSearch MenuSearch BarFixed SidebarSide NavigationResponsive SidebarFullscreen NavigationOff-Canvas MenuHover Sidenav ButtonsSidebar with IconsHorizontal Scroll MenuVertical MenuBottom NavigationResponsive Bottom NavBottom Border Nav LinksRight Aligned Menu LinksCentered Menu LinkEqual Width Menu LinksFixed MenuSlide Down Bar on ScrollHide Navbar on ScrollShrink Navbar on ScrollSticky NavbarNavbar on ImageHover DropdownsClick DropdownsCascading DropdownDropdown in TopnavDropdown in SidenavResp Navbar DropdownSubnavigation MenuDropupMega MenuMobile MenuCurtain MenuCollapsed SidebarCollapsed SidepanelPaginationBreadcrumbsButton GroupVertical Button GroupSticky Social BarPill NavigationResponsive Header
CSS background-clip Property
The CSS property specifies the painting area of the background.
The property takes three different values:
- border-box — (default) the background is painted to the outside edge of the border
- padding-box — the background is painted to the outside edge of the padding
- content-box — the background is painted within the content box
The following example illustrates the property:
Example
#example1
{
border: 10px dotted black;
padding: 35px; background: yellow;
background-clip: content-box;}
CSS Advanced Background Properties
| Property | Description |
|---|---|
| background | A shorthand property for setting all the background properties in one declaration |
| background-clip | Specifies the painting area of the background |
| background-image | Specifies one or more background images for an element |
| background-origin | Specifies where the background image(s) is/are positioned |
| background-size | Specifies the size of the background image(s) |
❮ Previous
Next ❯
Оставить ответ
HTML5 Element
HTML5 introduced the element, which lets you define more than one
image.
Browser Support
| Element | |||||
|---|---|---|---|---|---|
| <picture> | 13 | 38.0 | 38.0 | 9.1 | 25.0 |
The element works similar to the and
elements. You set up different sources, and the first source that fits the
preferences is the one being used:
Example
<picture> <source srcset=»img_smallflower.jpg» media=»(max-width:
400px)»> <source srcset=»img_flowers.jpg»> <img
src=»img_flowers.jpg» alt=»Flowers»></picture>
The attribute is required, and defines the source of the image.
The attribute is optional, and accepts the media queries you find in
CSS @media rule.
You should also define an element for browsers that do not support the
element.
❮ Previous
Next ❯
CSS Reference
CSS ReferenceCSS Browser SupportCSS SelectorsCSS FunctionsCSS Reference AuralCSS Web Safe FontsCSS Font FallbacksCSS AnimatableCSS UnitsCSS PX-EM ConverterCSS ColorsCSS Color ValuesCSS Default ValuesCSS Entities
CSS Properties
align-content
align-items
align-self
all
animation
animation-delay
animation-direction
animation-duration
animation-fill-mode
animation-iteration-count
animation-name
animation-play-state
animation-timing-function
backface-visibility
background
background-attachment
background-blend-mode
background-clip
background-color
background-image
background-origin
background-position
background-repeat
background-size
border
border-bottom
border-bottom-color
border-bottom-left-radius
border-bottom-right-radius
border-bottom-style
border-bottom-width
border-collapse
border-color
border-image
border-image-outset
border-image-repeat
border-image-slice
border-image-source
border-image-width
border-left
border-left-color
border-left-style
border-left-width
border-radius
border-right
border-right-color
border-right-style
border-right-width
border-spacing
border-style
border-top
border-top-color
border-top-left-radius
border-top-right-radius
border-top-style
border-top-width
border-width
bottom
box-decoration-break
box-shadow
box-sizing
break-after
break-before
break-inside
caption-side
caret-color
@charset
clear
clip
clip-path
color
column-count
column-fill
column-gap
column-rule
column-rule-color
column-rule-style
column-rule-width
column-span
column-width
columns
content
counter-increment
counter-reset
cursor
direction
display
empty-cells
filter
flex
flex-basis
flex-direction
flex-flow
flex-grow
flex-shrink
flex-wrap
float
font
@font-face
font-family
font-feature-settings
font-kerning
font-size
font-size-adjust
font-stretch
font-style
font-variant
font-variant-caps
font-weight
grid
grid-area
grid-auto-columns
grid-auto-flow
grid-auto-rows
grid-column
grid-column-end
grid-column-gap
grid-column-start
grid-gap
grid-row
grid-row-end
grid-row-gap
grid-row-start
grid-template
grid-template-areas
grid-template-columns
grid-template-rows
hanging-punctuation
height
hyphens
@import
isolation
justify-content
@keyframes
left
letter-spacing
line-height
list-style
list-style-image
list-style-position
list-style-type
margin
margin-bottom
margin-left
margin-right
margin-top
max-height
max-width
@media
min-height
min-width
mix-blend-mode
object-fit
object-position
opacity
order
outline
outline-color
outline-offset
outline-style
outline-width
overflow
overflow-x
overflow-y
padding
padding-bottom
padding-left
padding-right
padding-top
page-break-after
page-break-before
page-break-inside
perspective
perspective-origin
pointer-events
position
quotes
resize
right
scroll-behavior
tab-size
table-layout
text-align
text-align-last
text-decoration
text-decoration-color
text-decoration-line
text-decoration-style
text-indent
text-justify
text-overflow
text-shadow
text-transform
top
transform
transform-origin
transform-style
transition
transition-delay
transition-duration
transition-property
transition-timing-function
unicode-bidi
user-select
vertical-align
visibility
white-space
width
word-break
word-spacing
word-wrap
writing-mode
z-index
CSS Tutorial
CSS HOMECSS IntroductionCSS SyntaxCSS SelectorsCSS How ToCSS CommentsCSS Colors
Colors
RGB
HEX
HSL
CSS Backgrounds
Background Color
Background Image
Background Repeat
Background Attachment
Background Shorthand
CSS Borders
Borders
Border Width
Border Color
Border Sides
Border Shorthand
Rounded Borders
CSS Margins
Margins
Margin Collapse
CSS PaddingCSS Height/WidthCSS Box ModelCSS Outline
Outline
Outline Width
Outline Color
Outline Shorthand
Outline Offset
CSS Text
Text Color
Text Alignment
Text Decoration
Text Transformation
Text Spacing
Text Shadow
CSS Fonts
Font Family
Font Web Safe
Font Style
Font Size
Font Google
Font Shorthand
CSS IconsCSS LinksCSS ListsCSS Tables
Table Borders
Table Size
Table Alignment
Table Style
Table Responsive
CSS DisplayCSS Max-widthCSS PositionCSS OverflowCSS Float
Float
Clear
Float Examples
CSS Inline-blockCSS AlignCSS CombinatorsCSS Pseudo-classCSS Pseudo-elementCSS OpacityCSS Navigation Bar
Navbar
Vertical Navbar
Horizontal Navbar
CSS DropdownsCSS Image GalleryCSS Image SpritesCSS Attr SelectorsCSS FormsCSS CountersCSS Website LayoutCSS UnitsCSS Specificity
Image Sprites — Hover Effect
Now we want to add a hover effect to our navigation list.
Tip: The selector can be used on all elements,
not only on links.
Our new image («img_navsprites_hover.gif») contains three navigation images
and three images to use for hover effects:
Because this is one single image, and not six separate files, there will be no
loading delay when a user hovers over the image.
We only add three lines of code to add the hover effect:
Example
#home a:hover { background: url(‘img_navsprites_hover.gif’) 0 -45px;}#prev a:hover { background: url(‘img_navsprites_hover.gif’) -47px
-45px;}#next a:hover { background: url(‘img_navsprites_hover.gif’) -91px
-45px;}
Example explained:
#home a:hover {background: url(‘img_navsprites_hover.gif’) 0 -45px;} — For all three hover images we specify the same background position, only 45px further down
❮ Previous
Next ❯
Images
SlideshowSlideshow GalleryModal ImagesLightboxResponsive Image GridImage GridTab GalleryImage Overlay FadeImage Overlay SlideImage Overlay ZoomImage Overlay TitleImage Overlay IconImage EffectsBlack and White ImageImage TextImage Text BlocksTransparent Image TextFull Page ImageForm on ImageHero ImageBlur Background ImageChange Bg on ScrollSide-by-Side ImagesRounded ImagesAvatar ImagesResponsive ImagesCenter ImagesThumbnailsBorder Around ImageMeet the TeamSticky ImageFlip an ImageShake an ImagePortfolio GalleryPortfolio with FilteringImage ZoomImage Magnifier GlassImage Comparison Slider
Интерполяция
Предположим, что у нас есть растровая картинка размером 200х200 пикселей и мы увеличиваем её пропорционально по ширине в два раза. Площадь изображения и общее количество пикселей вырастет при этом в четыре раза. Новые пиксели добавляются браузером самостоятельно исходя из набора уже имеющихся. Способ получения этих новых пикселей называется интерполяцией изображения. Надо понимать, что качество очень сильно зависит от самого изображения, масштаба и алгоритма, но обычно результат получается хуже оригинала.
Похожее происходит и при уменьшении изображения, только браузеру уже приходится не добавлять, а выбрасывать часть пикселей.
Алгоритм интерполяции заложен в браузер и может быть изменён с помощью свойства image-rendering. К сожалению, браузеры пока слабо поддерживают это свойство, поэтому приходится указывать несколько разных значений. В примере 4 показано изменение алгоритма, чтобы переходы цветов не размывались, а оставались чёткими. В браузерах Chrome и Opera пример пока не работает, ожидается что поддержка свойства появится в новых версиях.
Пример 4. Изменение алгоритма интерполяции
<!DOCTYPE html>
<html>
<head>
<meta charset=»utf-8″>
<title>Изображения</title>
<style>
img { border: 1px solid #ccc; }
.edge {
image-rendering: -moz-crisp-edges; /* Firefox */
-ms-interpolation-mode: nearest-neighbor; /* IE */
image-rendering: crisp-edges; /* Стандартное свойство */
}
</style>
</head>
<body>
<img src=»image/russia.png» alt=»Флаг России» width=»200″>
<img src=»image/russia.png» alt=»Флаг России» width=»200″ class=»edge»>
</body>
</html>
Результат данного примера показан на рис. 3. Для левой картинки применяется алгоритм, заданный по умолчанию; для правой — метод интерполяции по ближайшим точкам.
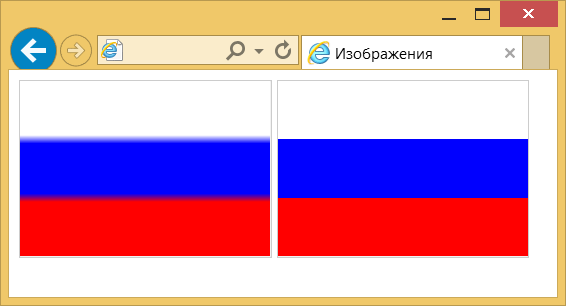
Рис. 3. Вид картинок после увеличения масштаба
Images
SlideshowSlideshow GalleryModal ImagesLightboxResponsive Image GridImage GridTab GalleryImage Overlay FadeImage Overlay SlideImage Overlay ZoomImage Overlay TitleImage Overlay IconImage EffectsBlack and White ImageImage TextImage Text BlocksTransparent Image TextFull Page ImageForm on ImageHero ImageBlur Background ImageChange Bg on ScrollSide-by-Side ImagesRounded ImagesAvatar ImagesResponsive ImagesCenter ImagesThumbnailsBorder Around ImageMeet the TeamSticky ImageFlip an ImageShake an ImagePortfolio GalleryPortfolio with FilteringImage ZoomImage Magnifier GlassImage Comparison Slider
HTML5 Element
HTML5 introduced the element, which lets you define more than one
image.
Browser Support
| Element | |||||
|---|---|---|---|---|---|
| <picture> | 13 | 38.0 | 38.0 | 9.1 | 25.0 |
The element works similar to the and
elements. You set up different sources, and the first source that fits the
preferences is the one being used:
Example
<picture> <source srcset=»img_smallflower.jpg» media=»(max-width:
400px)»> <source srcset=»img_flowers.jpg»> <img
src=»img_flowers.jpg» alt=»Flowers»></picture>
The attribute is required, and defines the source of the image.
The attribute is optional, and accepts the media queries you find in
CSS @media rule.
You should also define an element for browsers that do not support the
element.
❮ Previous
Next ❯
Responsive Image Gallery
CSS can be used to create image galleries. This example use
media queries to re-arrange the images on different screen sizes. Resize the
browser window to see the effect:
Add a description of the image here
Add a description of the image here
Add a description of the image here
Add a description of the image here
Example
.responsive {
padding: 0 6px; float: left; width: 24.99999%;}@media only screen and
(max-width: 700px){ .responsive {
width: 49.99999%; margin: 6px
0; }}@media only screen and (max-width: 500px){ .responsive { width: 100%;
}}
Tip: Read more about Responsive Web Design in our
CSS RWD Tutorial.
Использование атрибутов
Любую картинку можно как увеличивать, так и уменьшать в размерах, задавая значение высоты или ширины в пикселях или процентах от размера родителя. Если установлена только ширина или высота, то вторая величина вычисляется автоматически исходя из пропорций картинки. Два заданных значения могут исказить пропорции, особенно если они заданы неверно. В примере 1 показаны разные варианты задания размеров в пикселях.
Пример 1. Размеры в пикселях
<!DOCTYPE html>
<html>
<head>
<meta charset=»utf-8″>
<title>Изображения</title>
</head>
<body>
<img src=»image/redcat.jpg» alt=»Размеры не заданы»>
<img src=»image/redcat.jpg» alt=»Задана ширина» width=»400″>
<img src=»image/redcat.jpg» alt=»Задана ширина и высота» width=»400″ height=»400″>
</body>
</html>
В примере использовалась одна и та же фотография, для первого <img> размеры явно не указаны, поэтому браузер добавил изображение в исходном виде. Для второй фотографии указана ширина 400 пикселей, что привело к уменьшению её размеров при сохранении пропорций. Третья фотография искажена, поскольку задана одинаковая ширина и высота, притом, что исходное изображение не квадратное (рис. 1).
Рис. 1. Размеры фотографии
Аналогичным образом задаются размеры в процентах от ширины родительского элемента, таким образом можно установить картинку на всю ширину окна браузера. В примере 2 показано добавление трёх фотографий в ряд, ширина которых привязана к ширине окна.
Пример 2. Размеры в процентах
<!DOCTYPE html>
<html>
<head>
<meta charset=»utf-8″>
<title>Изображения</title>
<style>
figure {
width: 27%; /* Ширина */
float: left; /* Выстраиваем элементы по горизонтали */
margin: 0 0 0 3.5%; /* Отступ слева */
background: #f0f0f0; /* Цвет фона */
border-radius: 5px; /* Радиус скругления */
padding: 2%; /* Поля */
}
figure:first-child {
margin-left: 0; /* Убираем отступ для первого элемента */
}
</style>
</head>
<body>
<figure>
<img src=»image/redcat.jpg» alt=»Рыжая кошка» width=»100%»>
</figure>
<figure>
<img src=»image/redcat.jpg» alt=»Рыжая кошка» width=»100%»>
</figure>
<figure>
<img src=»image/redcat.jpg» alt=»Рыжая кошка» width=»100%»>
</figure>
</body>
</html>
В данном примере все размеры заданы в процентах, так что приходится пользоваться математикой, чтобы суммарная ширина не получилась больше 100%. Ширину каждого элемента <figure> устанавливаем как 27%, к ней добавляется поле слева и справа по 2%, итого каждый элемент занимает 31%, а всего 31х3=93%. Оставшиеся 100-93=7% делим пополам, в итоге 7/2=3.5% — столько получается ширина промежутка между блоками. Для первого <figure> отступ слева нам не нужен, поэтому его убираем через свойство margin-left. Результат данного примера показан на рис. 2.
Рис. 2. Масштабирование фотографий
CSS Tutorial
CSS HOMECSS IntroductionCSS SyntaxCSS SelectorsCSS How ToCSS CommentsCSS Colors
Colors
RGB
HEX
HSL
CSS Backgrounds
Background Color
Background Image
Background Repeat
Background Attachment
Background Shorthand
CSS Borders
Borders
Border Width
Border Color
Border Sides
Border Shorthand
Rounded Borders
CSS Margins
Margins
Margin Collapse
CSS PaddingCSS Height/WidthCSS Box ModelCSS Outline
Outline
Outline Width
Outline Color
Outline Shorthand
Outline Offset
CSS Text
Text Color
Text Alignment
Text Decoration
Text Transformation
Text Spacing
Text Shadow
CSS Fonts
Font Family
Font Web Safe
Font Style
Font Size
Font Google
Font Shorthand
CSS IconsCSS LinksCSS ListsCSS Tables
Table Borders
Table Size
Table Alignment
Table Style
Table Responsive
CSS DisplayCSS Max-widthCSS PositionCSS OverflowCSS Float
Float
Clear
Float Examples
CSS Inline-blockCSS AlignCSS CombinatorsCSS Pseudo-classCSS Pseudo-elementCSS OpacityCSS Navigation Bar
Navbar
Vertical Navbar
Horizontal Navbar
CSS DropdownsCSS Image GalleryCSS Image SpritesCSS Attr SelectorsCSS FormsCSS CountersCSS Website LayoutCSS UnitsCSS Specificity
Menus
Icon BarMenu IconAccordionTabsVertical TabsTab HeadersFull Page TabsHover TabsTop NavigationResponsive TopnavNavbar with IconsSearch MenuSearch BarFixed SidebarSide NavigationResponsive SidebarFullscreen NavigationOff-Canvas MenuHover Sidenav ButtonsSidebar with IconsHorizontal Scroll MenuVertical MenuBottom NavigationResponsive Bottom NavBottom Border Nav LinksRight Aligned Menu LinksCentered Menu LinkEqual Width Menu LinksFixed MenuSlide Down Bar on ScrollHide Navbar on ScrollShrink Navbar on ScrollSticky NavbarNavbar on ImageHover DropdownsClick DropdownsCascading DropdownDropdown in TopnavDropdown in SidenavResp Navbar DropdownSubnavigation MenuDropupMega MenuMobile MenuCurtain MenuCollapsed SidebarCollapsed SidepanelPaginationBreadcrumbsButton GroupVertical Button GroupSticky Social BarPill NavigationResponsive Header
Стимулирование использования этого решения
Поскольку предложенное решение — это просто работа CSS-стилей, в итоге пришли к тому, что его можно было просто добавить в таблицу стилей браузера, что не требовало бы от разработчиков никаких усилий для получения преимуществ.
Таблица стилей браузера — место, где заданы CSS-стили по умолчанию (например, какой у элемента ). При необходимости, их можно переопределить собственными правилами оформления. Добавляя вышеупомянутое свойство , нам не нужно стимулировать использование этого решения разработчиками — мы, по сути, автоматически включаем его для всех сайтов, которые соответствуют четырём указанным выше условиям.
Однако, это зависит от функции , имеющей доступ к HTML-атрибутам и , и от свойства — ни то, ни другое ещё полностью браузерами не поддерживается. Поэтому вместо этого, в качестве более простого решения, браузеры могут заложить такое поведение в коде рендеринга страницы, а не раскрывать его в таблицах стилей браузера, но эффект будет тот же. Такой альтернативный способ реализации даже был .
Firefox первым реализовал этот принцип в виде эксперимента, после чего включил его по умолчанию в Firefox 71. Как только это было сделано, ваш сайт мог стать немного быстрее и удобнее. Возможно, в будущем это будет реализовано через таблицы стилей браузера, но пока что спасибо и на этом.
Images
SlideshowSlideshow GalleryModal ImagesLightboxResponsive Image GridImage GridTab GalleryImage Overlay FadeImage Overlay SlideImage Overlay ZoomImage Overlay TitleImage Overlay IconImage EffectsBlack and White ImageImage TextImage Text BlocksTransparent Image TextFull Page ImageForm on ImageHero ImageBlur Background ImageChange Bg on ScrollSide-by-Side ImagesRounded ImagesAvatar ImagesResponsive ImagesCenter ImagesThumbnailsBorder Around ImageMeet the TeamSticky ImageFlip an ImageShake an ImagePortfolio GalleryPortfolio with FilteringImage ZoomImage Magnifier GlassImage Comparison Slider
Комментарии
Положение фона
Для управления положением фонового рисунка на странице применяется стилевое свойство background-position, оно одновременно устанавливает координаты изображения по горизонтали и вертикали. Чтобы отменить повторение фоновой картинки используется значение no-repeat. Также можно воспользоваться универсальным background, как показано в примере 4.
Пример 4. Положение фона
<!DOCTYPE html>
<html>
<head>
<meta charset=»utf-8″>
<title>Положение фонового рисунка</title>
<style>
body {
background: url(/example/image/tomato.jpg) right bottom no-repeat fixed; /* Параметры фона */
margin-right: 200px; /* Отступ справа */
}
</style>
</head>
<body>
<h1>Консервы из помидор</h1>
<p>Плоды отбирают с хорошей ровной окраской, плотные и однородные по
размеру, укладывают в банки и заливают кипящим рассолом (на 1 л воды — 35 г
поваренной соли и 6 г лимонной кислоты). Банки прикрывают крышками и
ставят на прогревание, выдерживая в кипящей воде: литровые — 5-8,
трехлитровые — 12-15 мин. Затем их укупоривают и охлаждают.</p>
<p>Примерный расход сырья и продуктов на литровую банку: помидоров
красных отборных — 550-600 г, соли — 15 г, лимонной кислоты — 3 г.</p>
</body>
</html>
Результат данного примера показан на рис. 5. Изображение позиционируется в нужном месте с помощью значений right bottom свойства background. Чтобы текст не отображался поверх рисунка, справа на странице добавлен отступ через margin-right.
Рис. 5. Фоновая картинка в правом нижнем углу окна
Точное положение фона задаётся с помощью пикселей, но в основном применяется процентная запись или ключевые слова, как показано ниже:
- top left = left top = 0% 0% (в левом верхнем углу);
- top = top center = center top = 50% 0% (по центру вверху);
- right top = top right = 100% 0% (в правом верхнем углу);
- left = left center = center left = 0% 50% (по левому краю и по центру);
- center = center center = 50% 50% (по центру);
- right = right center = center right = 100% 50% (по правому краю и по центру);
- bottom left = left bottom = 0% 100% (в левом нижнем углу);
- bottom = bottom center = center bottom = 50% 100% (по центру внизу);
- bottom right = right bottom = 100% 100% (в правом нижнем углу).
Таким образом, для добавления фона в правый нижний угол для background-position можно указать значение right bottom или bottom right или 100% 100%. Они равнозначны и дают одинаковый результат.
Рисунок на поле
При такой схеме изображение располагается справа или слева от текста, причем
его обтекание происходит только с одной стороны. Фактически это напоминает две
колонки, в одной из них находится рисунок, а в другой текст (рис. 3).
Рис. 3. Изображение размещается на поле слева от текста
Существует несколько методов достижения подобного результата. Рассмотрим два
из них — использование таблицы и применение стилевого свойства margin.
Применение таблиц
Таблицы удобны тем, что позволяют легко создать структуру колонок с помощью
ячеек. Потребуется таблица с тремя ячейками, в одной будет располагаться изображение,
во второй текст, а третья нужна, чтобы создать отступ между ними. Можно также
обойтись и двумя ячейками, а нужное расстояние задать через стили или с помощью
атрибута width тега <td>.
В примере 4 показано создание указанной таблицы.
Пример 4. Создание рисунка на поле с помощью таблиц
Результат примера показан на рис. 4.
Рис. 4. Изображение слева от текста
В данном примере ширина рисунка составляет 90 пикселов, а ширина колонки, где
он располагается — 110 пикселов. Разница между ними и обеспечивает нужное
расстояние от текста до картинки. Чтобы атрибуты таблицы cellspacing
и cellpadding не вмешивались в процесс, их значения
лучше обнулить
Обратите внимание, что в ячейках задается выравнивание по высоте
Использование стилей
В данном случае потребуется два слоя, параметры которых будем изменять через
CSS. Изображение поместим в слой с именем pic, а текст, сильно не мудрствуя,
в слой text. Теперь для слоя piс следует установить свойство float
со значением left, а для text — margin-left.
Значение этого параметра равно ширине рисунка плюс необходимый отступ до текста
(пример 5).
Пример 5. Использование margin
Свойство float в данном примере нужно, чтобы верхний
край текста совпадал с верхним краем рисунка. Без этого свойства слой text опускается вниз на высоту изображения.
Если рисунок следует расположить справа от текста, то значение float
меняем на right, а свойство margin-left
на margin-right.